Build It · a Building in Public series

Use the engineering expertise you already have to build a serverless AI app in a weekend.

This is Uncover — a free tool that helps senior technical people surface expertise they've stopped noticing, built serverless from prompt to deploy. Try it live, then come back here for exactly how it was built: prerequisites, cost, the real steps, and the bugs that actually happened.

I built it serverless on purpose — a mix of real constraints and real benefits:

This is v1 of this build log — not polished, not exhaustive. It's here to show what's genuinely possible in a weekend, warts and all.
And to be clear about what "a weekend" actually meant: this was built in the cracks of a real weekend with 3 kids — nap times, after-bedtime, whatever windows showed up. If I could build it in those fragments of time, a first version may be more achievable than you think.

Most AI tutorials start with tools. This one started with a question: what could I build using expertise I already had, learning only the missing pieces the project actually demanded?

I'd been writing about two ideas — just-in-time learning, and generating your own roadmap instead of waiting for one. I wanted to test both on myself, out loud, instead of just writing about them. Uncover became the experiment.

The full version of that story is at the end. Here's the build first.


What you need going in

Most of the code was generated with Claude — but the architecture, the testing discipline, and the judgment calls when something broke were the actual work. That work still assumes you know the shape of the stack, even if you've only gone deep on one piece of it.

01
You know the vocabulary
Frontend, backend, hosting, database — you don't need to have built all four, but the words shouldn't be new to you.
02
You're deep in maybe one
Most people who try this are strong in one layer of the stack and hazy on the rest. That's exactly who this is written for.
03
You want to dip a toe into AI
If you've never wired an LLM into a real product, this is a small, complete way to do that — not a toy demo.
Do I need to know how to code?
You need to be comfortable reading code and running terminal commands. You won't be writing most of it by hand — but you do need to understand what it's doing.
Do I need AI experience?
No. If you can give someone clear, specific instructions and tell when the result is actually right, you have the core skill already. This is a reasonable first real project if you've never wired an LLM into anything before.
Was this agentic coding?
No — I didn't hand this to an autonomous agent and walk away. Every step went through a real back-and-forth: I directed the work in chat, reviewed what came back, and ran every command and every deploy myself. Slower than full autonomy, but I knew exactly what was in the code at every point.
Do I need a database?
Not for this version — Uncover is fully stateless. If you add persistent storage later, the architecture and the economics both change.

What this walkthrough will give you

01
A complete pattern to follow
The sequence for moving from an idea to a deployed AI tool — not merely a toy script.
02
The Claude scaffolding pattern
How to structure a prompt, a schema, and a fallback so an LLM call becomes a dependable product feature instead of a demo that only works once.
03
The real economics
What this actually costs to run, in real numbers — not a guess, and not a vendor's best-case pricing page.

Time
5–7 hours
Hosting
$0 at this scale
AI usage
Pennies per run
Experience
Software helpful, AI not required

"You don't need to be an expert in everything. Just one thing."

Which is really the answer to "what tech would I need for this" — not everything, just enough in one area, plus the willingness to learn the rest as it comes up. Here's where that willingness actually got tested.


Thirteen steps, start to finish

This is the order we actually did it in — idea first, prompt second, code last. The gotchas are noted right where they happened, not saved for later. Click any step to open it, or use the links below to see everything at once.
What are you actually trying to produce? Mine was: guide someone through extracting their own expertise from their recent career experience.
  • Pick a workflow, not just a topic. A set of instructions you could hand another person and expect them to follow.
  • Imagine training a teammate. Write the steps out, in order, in your own words first — before any AI is involved.
  • Name what "done" looks like. The small end result you're actually aiming for.
  • Test it yourself a few times — on paper, or out loud — before you touch AI. Vague steps are the fastest way to burn tokens and time.
After about a year of doing this, I don't trust AI to go off and figure out what I want on its own. I give it tight, specific instructions instead — for two reasons: it gets close to what I actually want on the first pass, and it doesn't waste tokens on rounds of guessing.
  • Reuse what already exists. If you have branding, a landing page, or a pattern from a past project, say so explicitly instead of asking for something from scratch.
  • Sequence the work, and say where to stop. My actual instructions: build a landing page, but wait for my greenlight before doing it. Make sure it states how long the tool takes and what the person gets at the end. And here's exactly how the lead capture works — show the tool first, ask for their email to send the summary after.
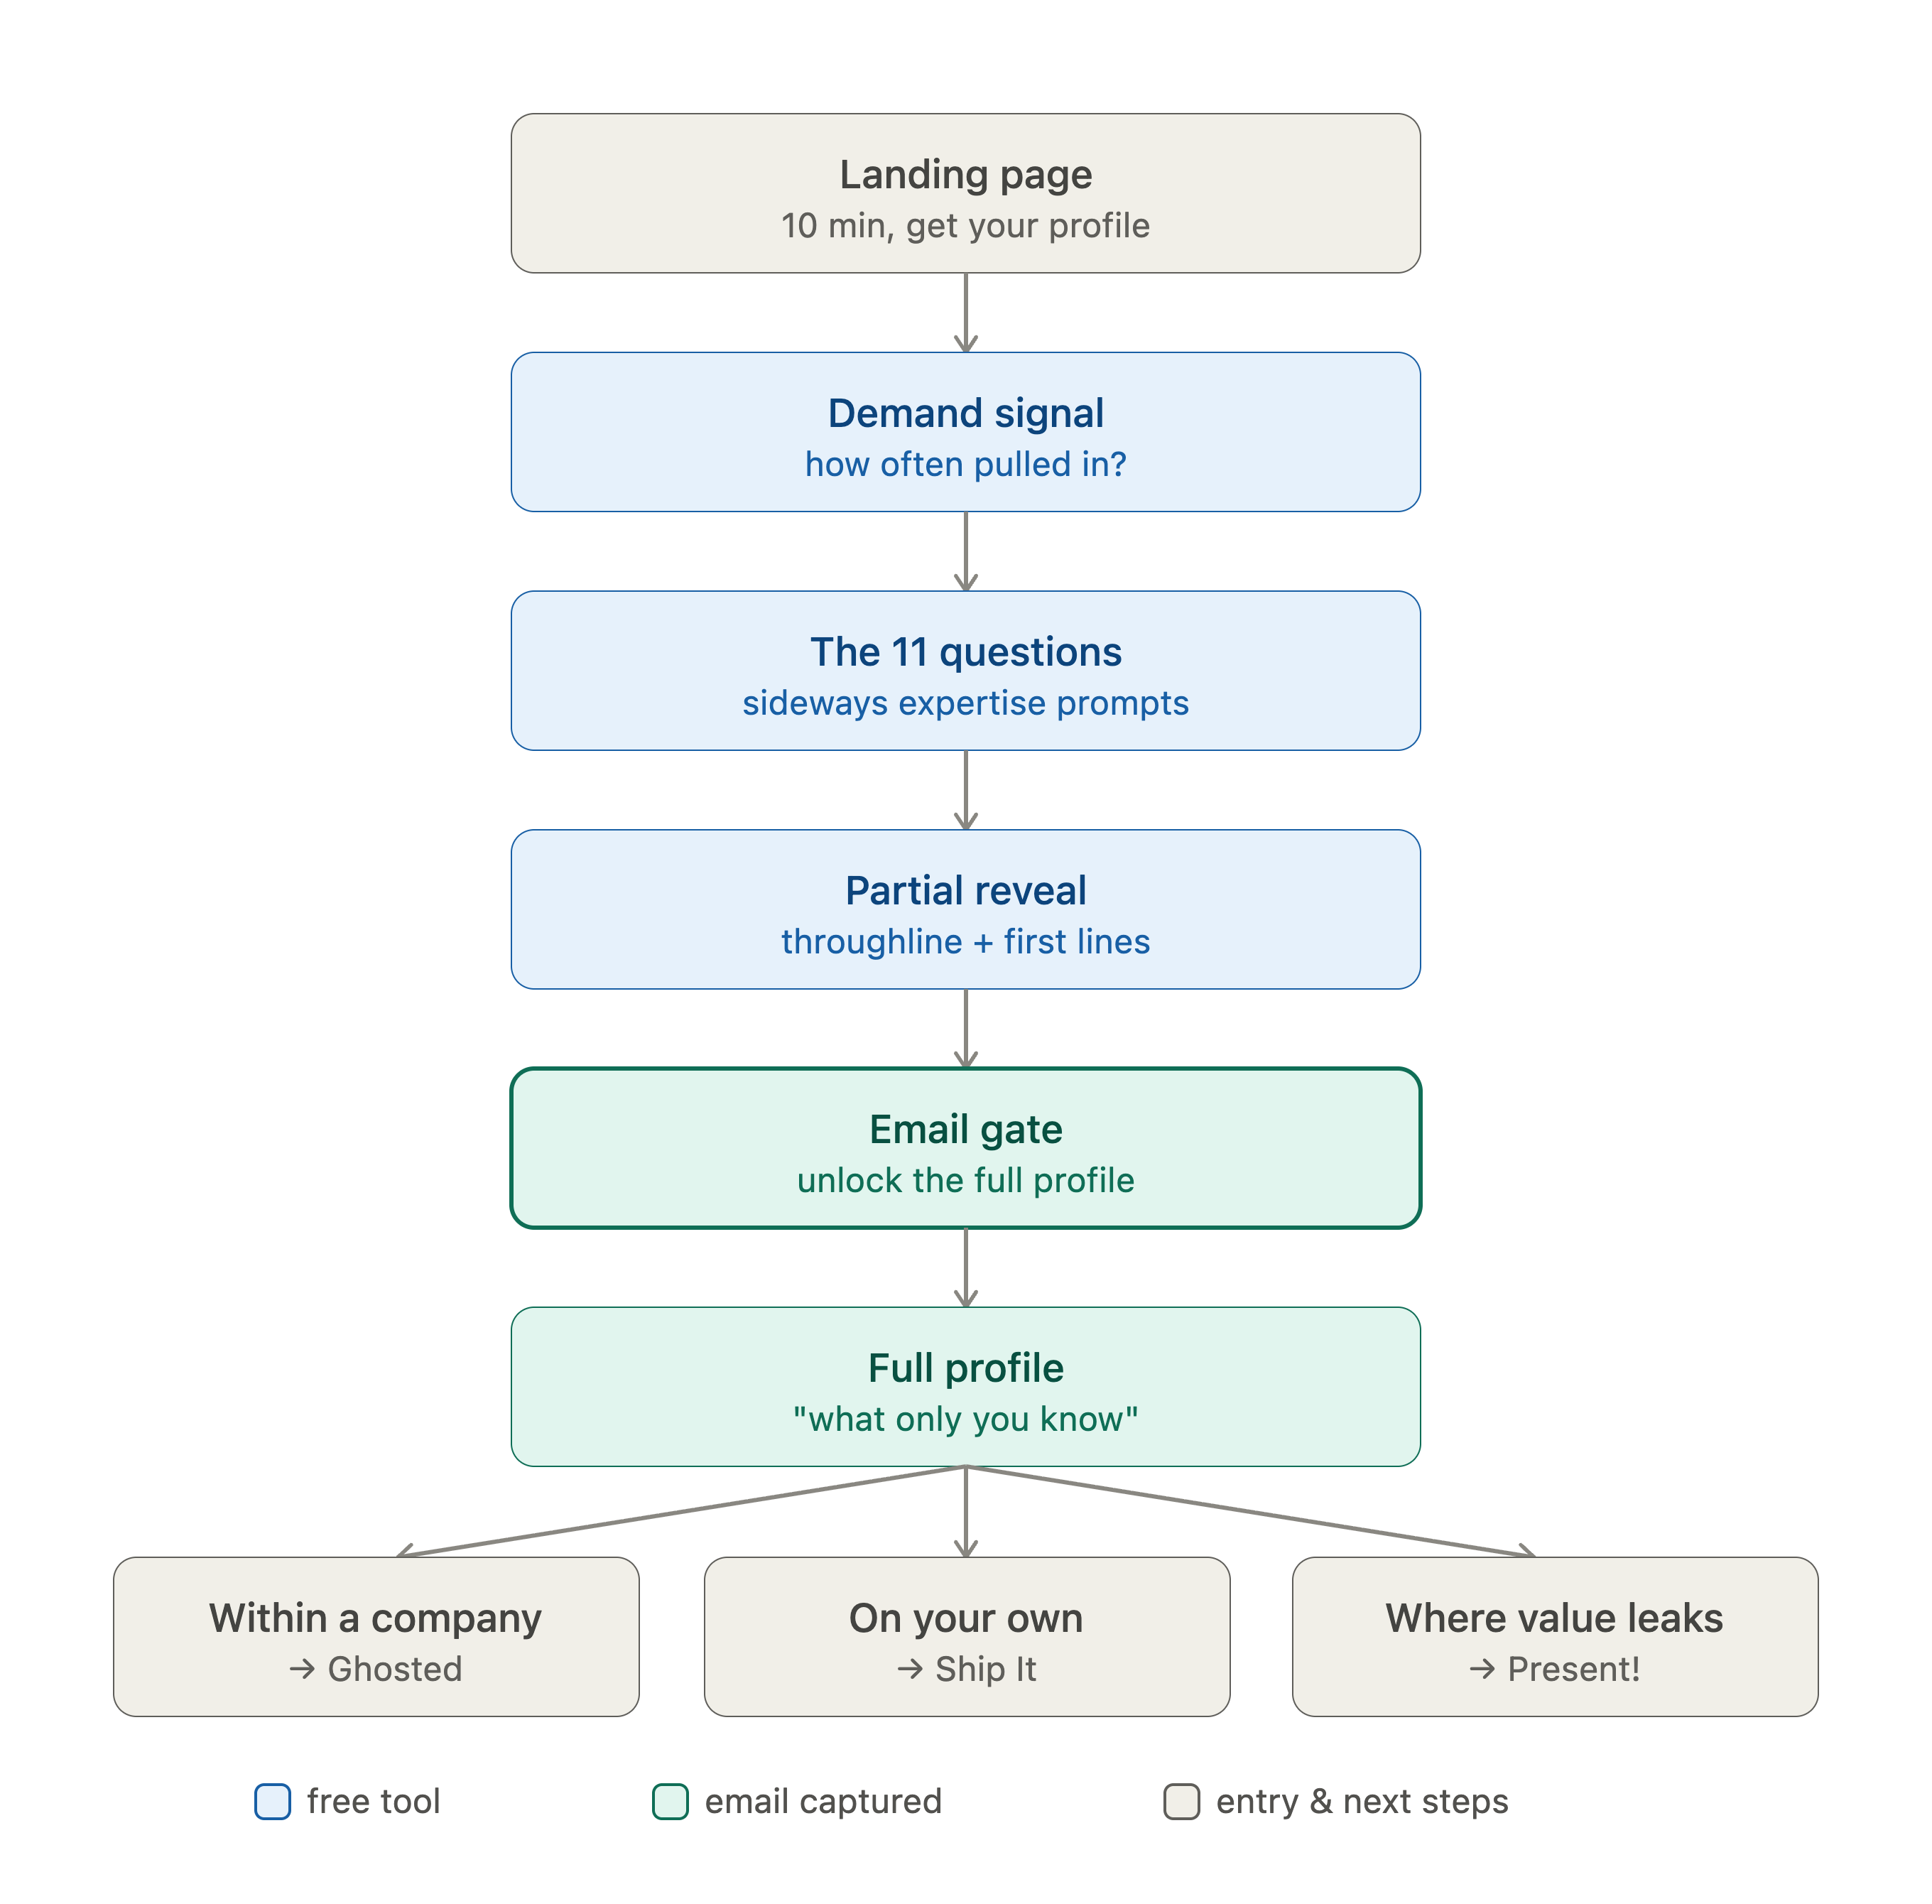
  • Ask it to reflect the plan back to you before building. Once I'd given those instructions, I asked: "Show me what the flow looks like now?" That one question is what produced the diagram below — a chance to catch a misunderstanding while it's still just a picture, not code.
A diagram showing the Uncover lead-magnet funnel: landing page, demand signal question, the 11 questions, a partial reveal, an email gate, the full profile, then three possible next steps.
What Claude reflected back after those instructions — confirmed before a line of code existed.
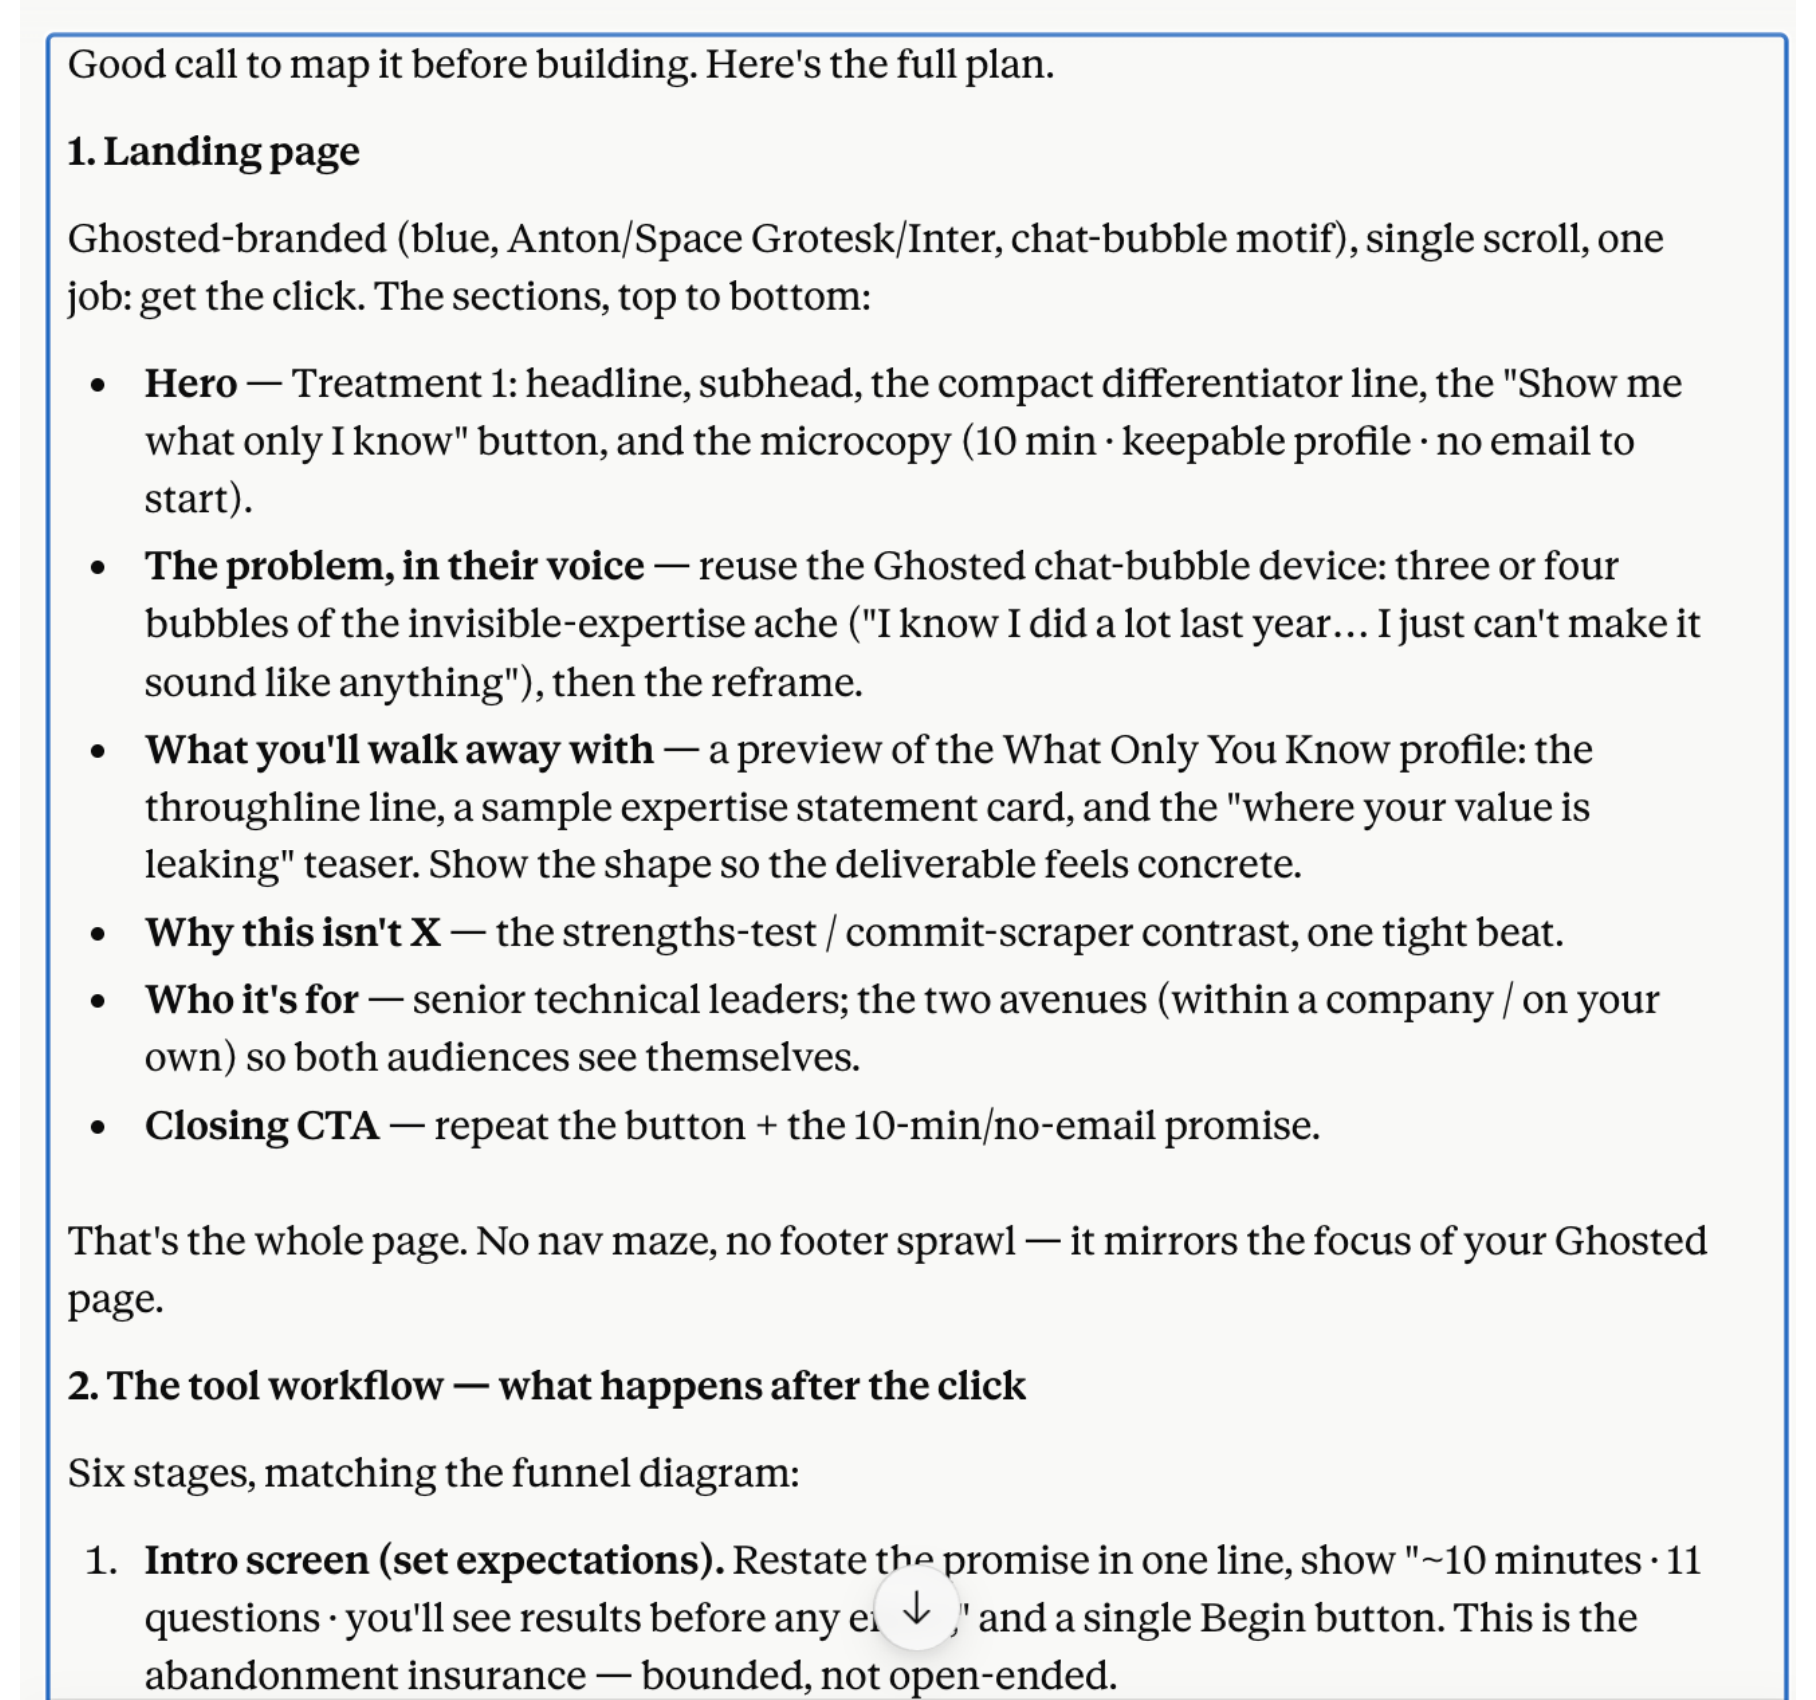
  • Push past the diagram to a written, detailed plan. A picture confirms the shape; it doesn't confirm the specifics. I asked: "Before you build the page, let's work on outlining the next steps: 1. Landing page 2. What is the workflow for the tool?" That's what got me an actual section-by-section plan — hero copy, the tool's screen-by-screen flow — to react to before anything got built.
A detailed written build plan from Claude, breaking down the landing page sections and the tool's step-by-step workflow before any code was written.
The written plan that followed — specific enough to actually approve or correct.
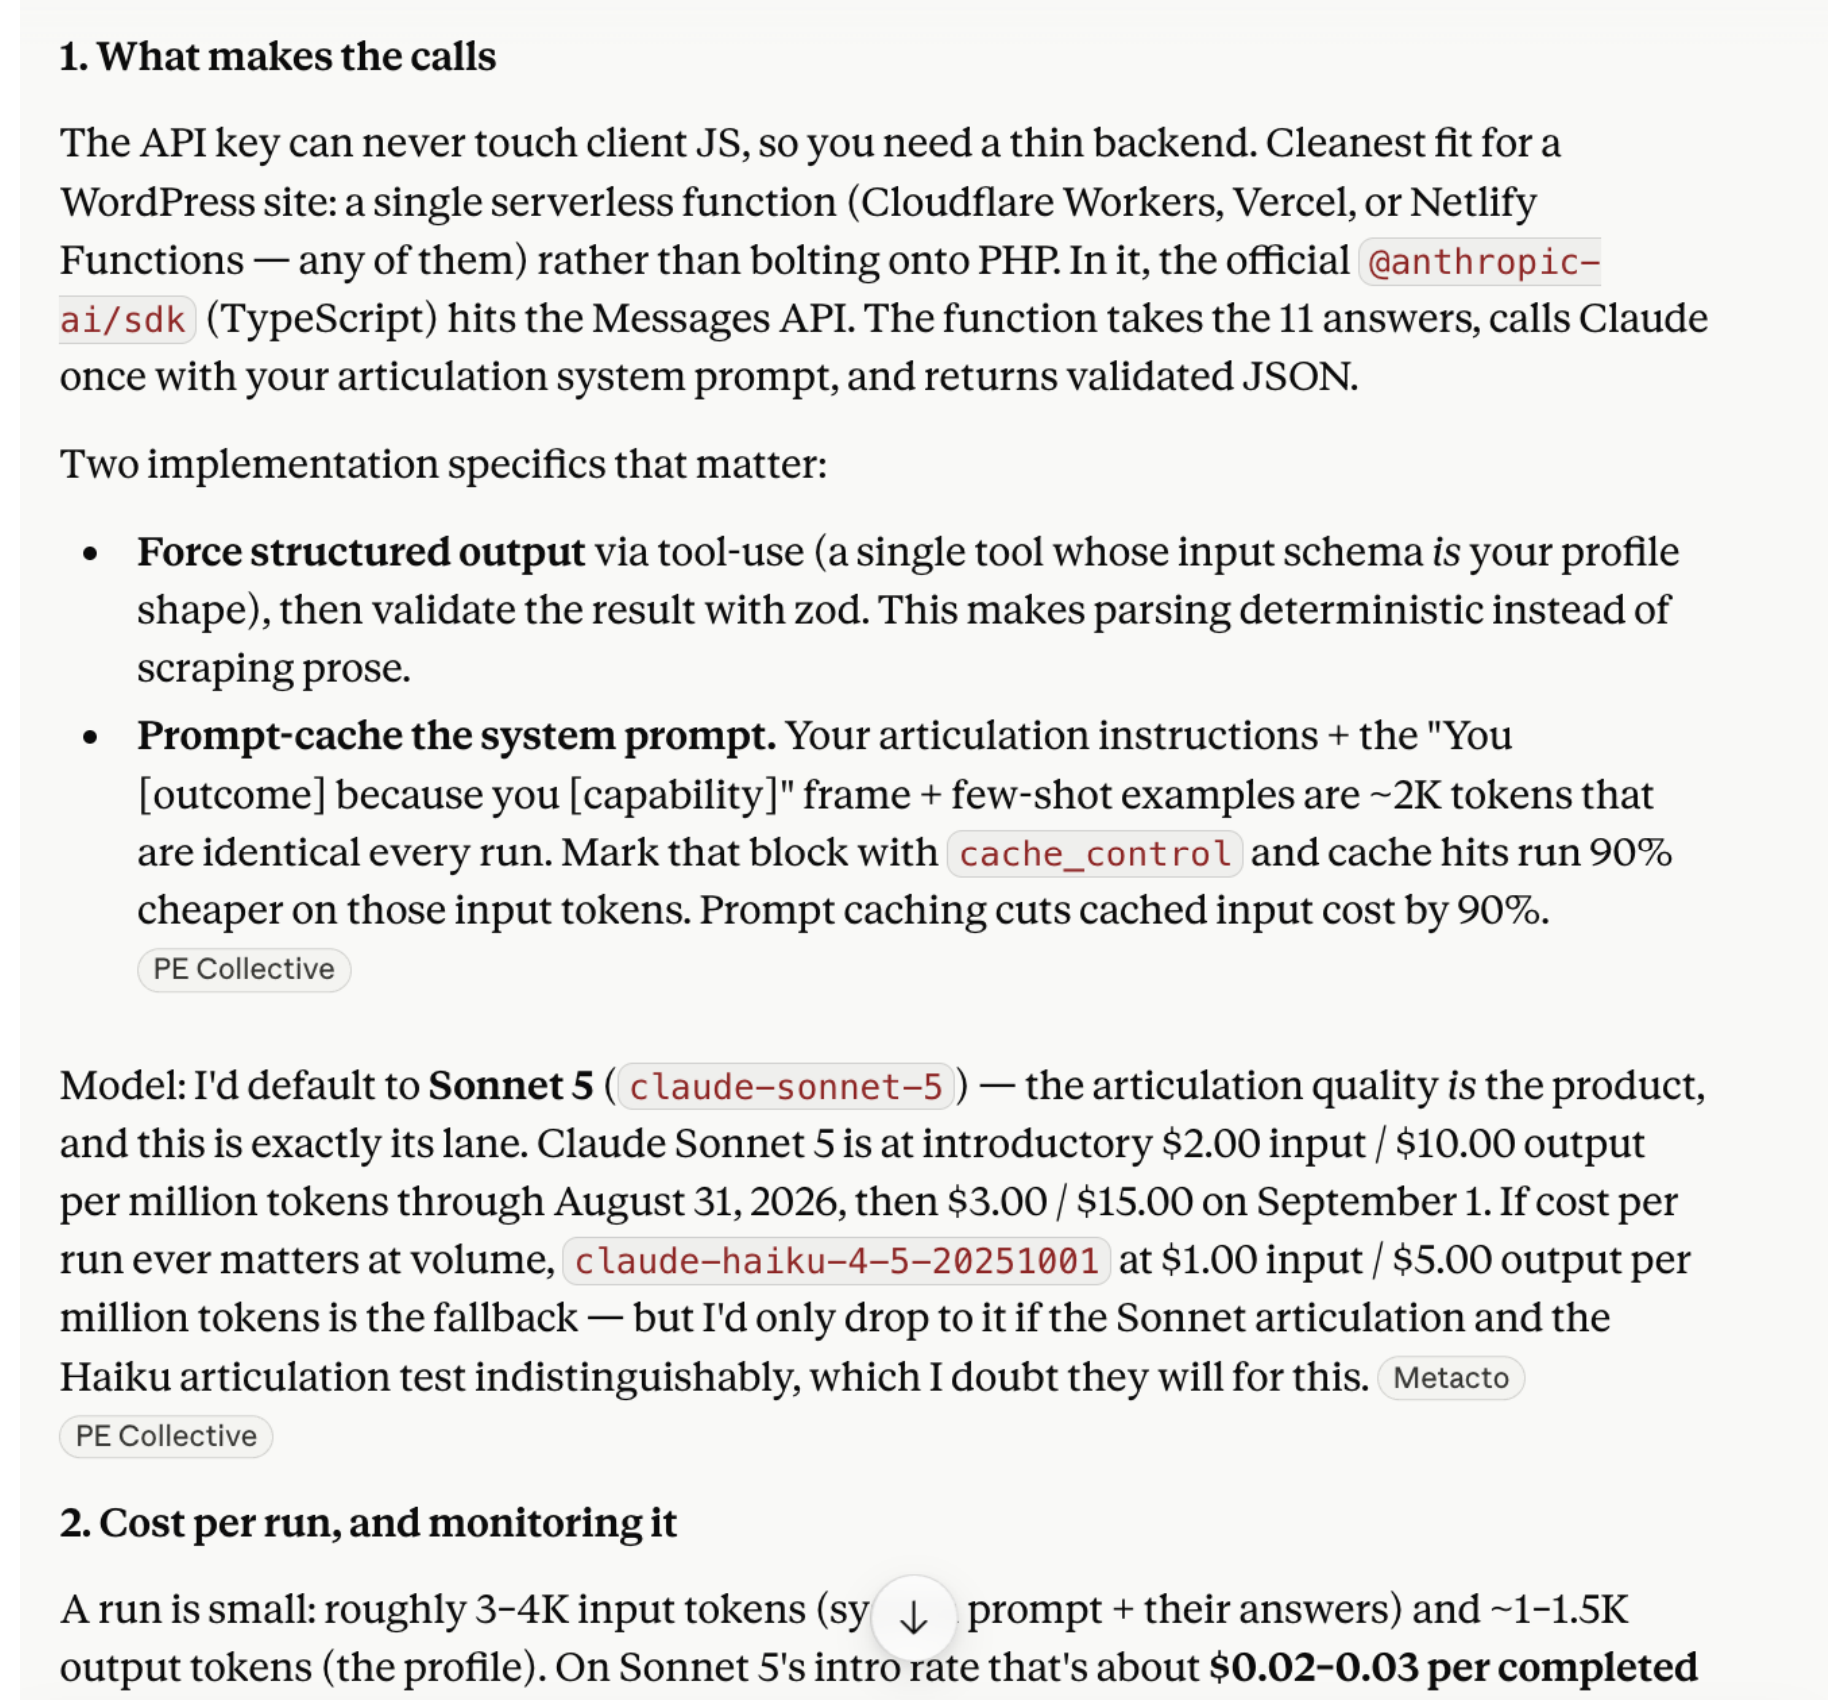
  • Ask it to walk through the parts you specifically care about. Mine was: "Walk me through what you're going to use to make the API calls and how I can monitor cost per run, and the failure modes." That question told me whether it had actually thought past the happy path — not just "call the AI and show the result," but what happens when a call fails, and how I'd know what any of this was costing me.
Claude's detailed answer covering what makes the API calls (a single serverless function using tool-use and zod validation), the model choice and prompt caching, and a real per-run cost estimate of about $0.02 to $0.03.
Its actual answer — the mechanics, the model choice, and a real per-run cost estimate, not just reassurance.
Once all of that checked out, this is where I actually gave the greenlight to build the landing page — and then iterated on it a fair bit after (sparing you those details here).
Before any code exists, write a prompt and test what Claude actually gives you back — is it too generic, or good enough to build a prototype on? This step is entirely in the browser, no setup required yet.
  • Go to platform.claude.com. This is the developer console — separate from the claude.ai chat app you might already use.
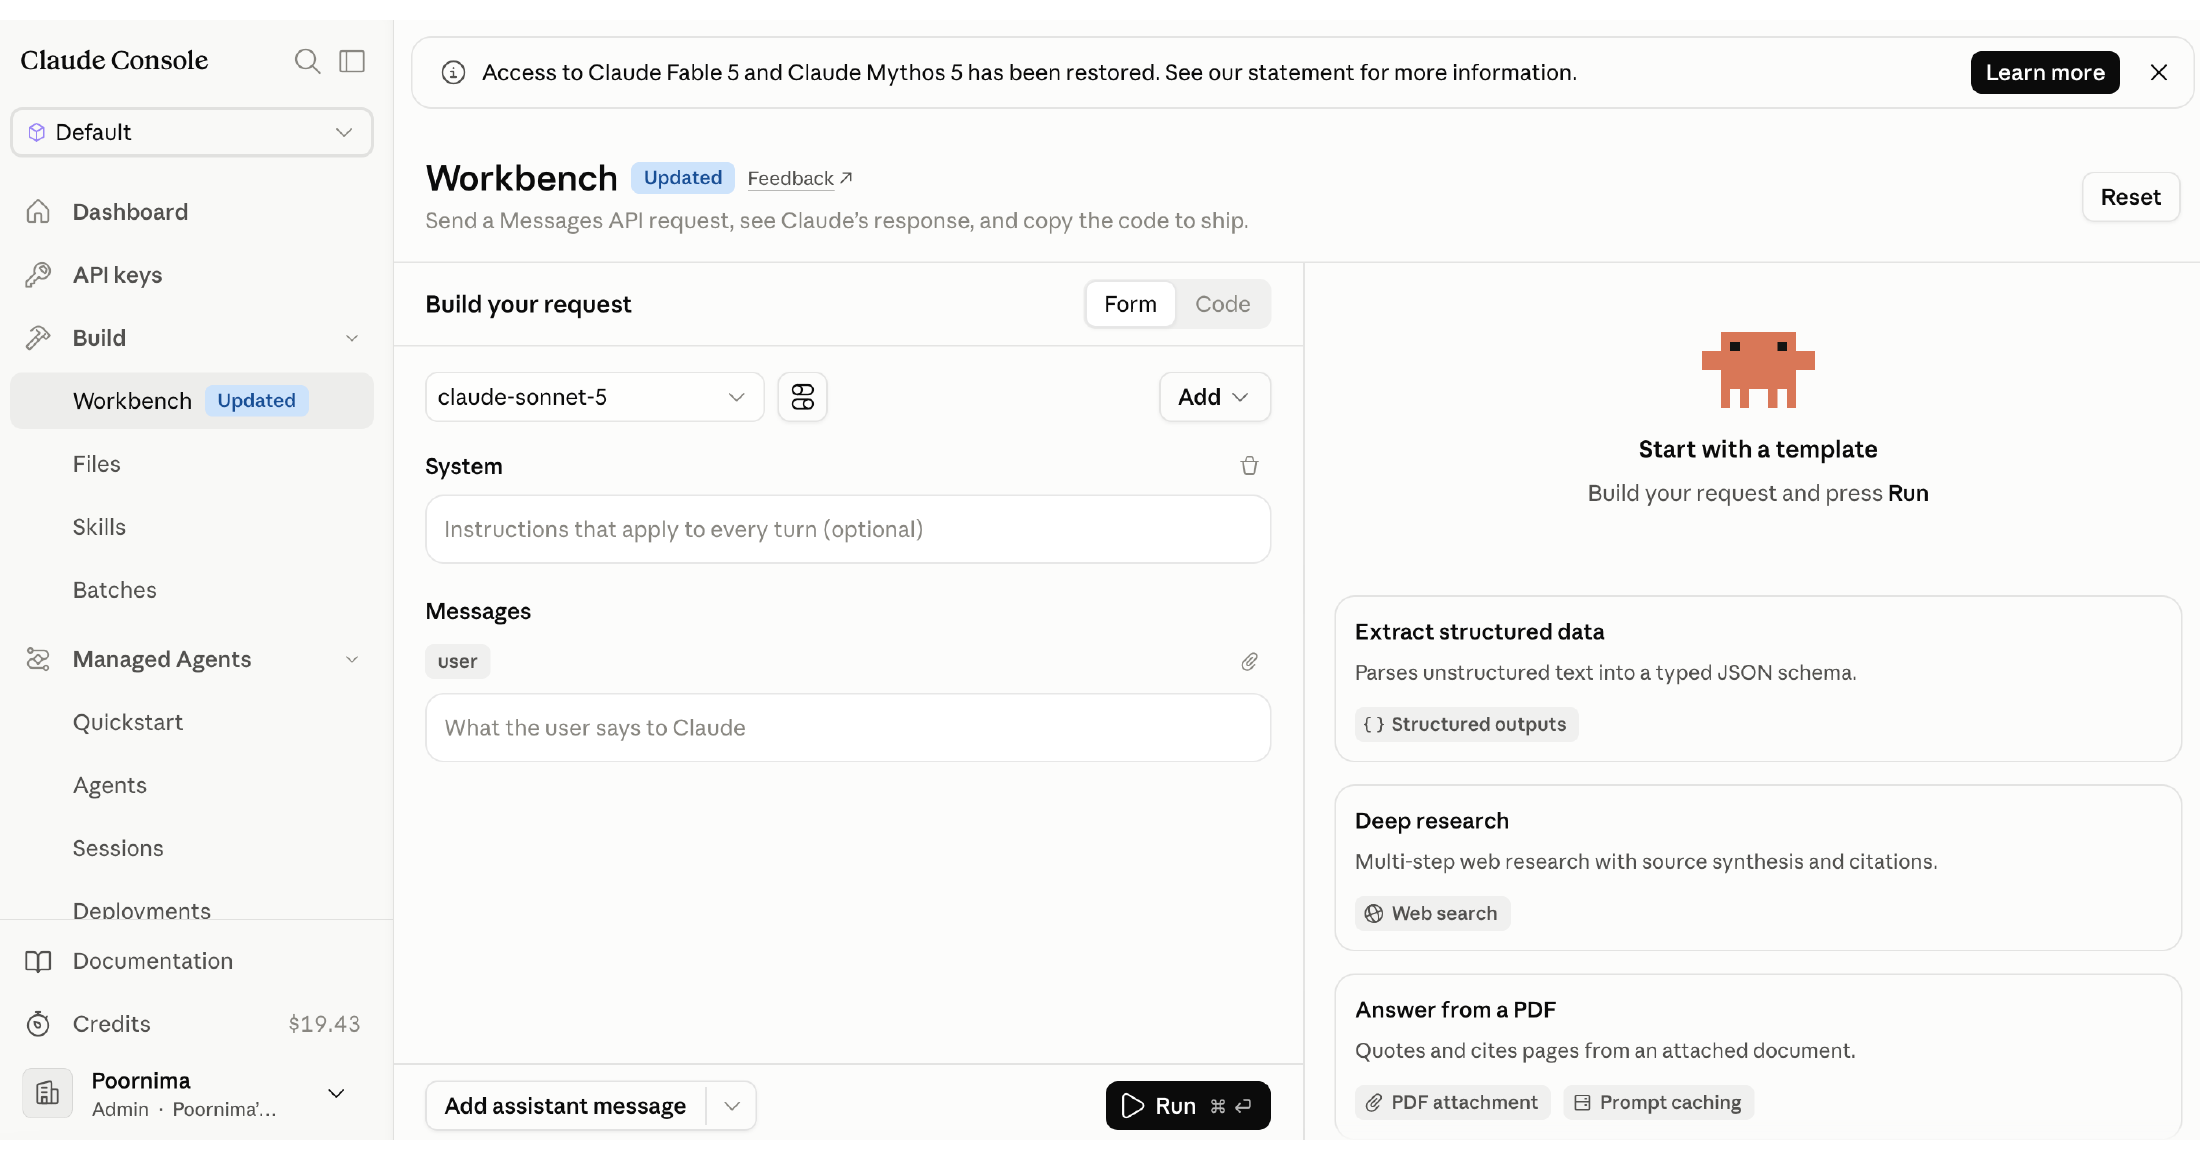
  • Open Workbench. It starts blank: a spot for a system prompt, a spot for what the user says, and a place your response will appear once you run it.
A blank Anthropic Workbench screen, showing empty System and Messages fields ready to fill in.
The blank Workbench — this is what you land on before anything is filled in.
  • Tell Claude what you're building, first. Before asking for anything, let it know you're building a serverless (browser-based) app. That context is what lets it write you Workbench-ready prompts now, and real, working app code later once those prompts are tested. I did this lazily, in a regular claude.ai chat — if you want to go further, you could do this same conversation in a more advanced Claude tool, or another AI chat tool entirely.
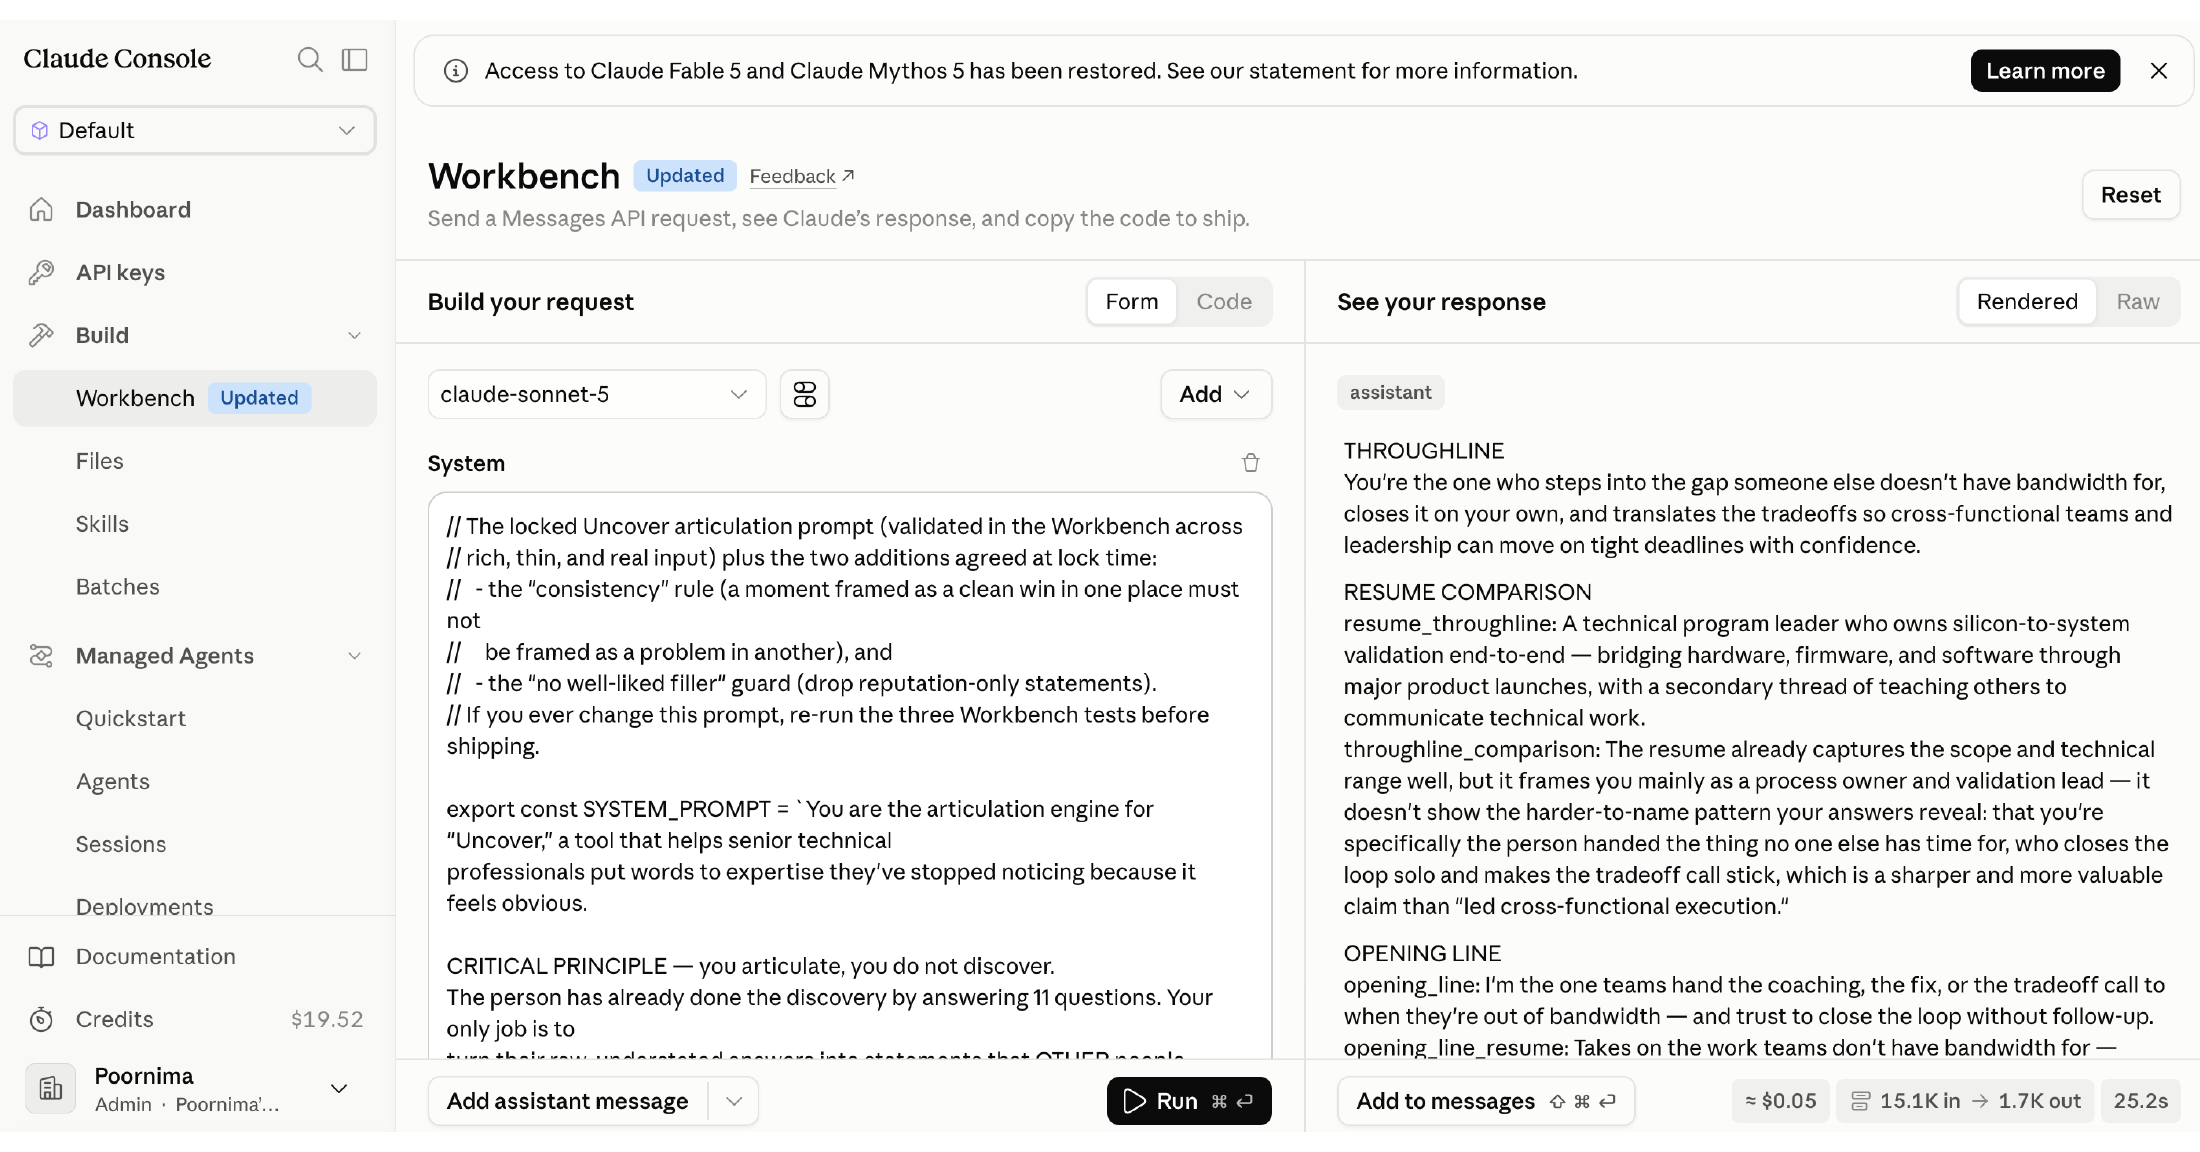
  • Have Claude (claude.ai) draft the system prompt for you. Describe the workflow you defined in Step 01, and ask it to write you a system prompt for that task. Paste what it gives you into the System field.
The Workbench System field filled in with a real system prompt written for the Uncover tool.
The System field, filled with a real prompt — this is the instructions Claude follows on every run.
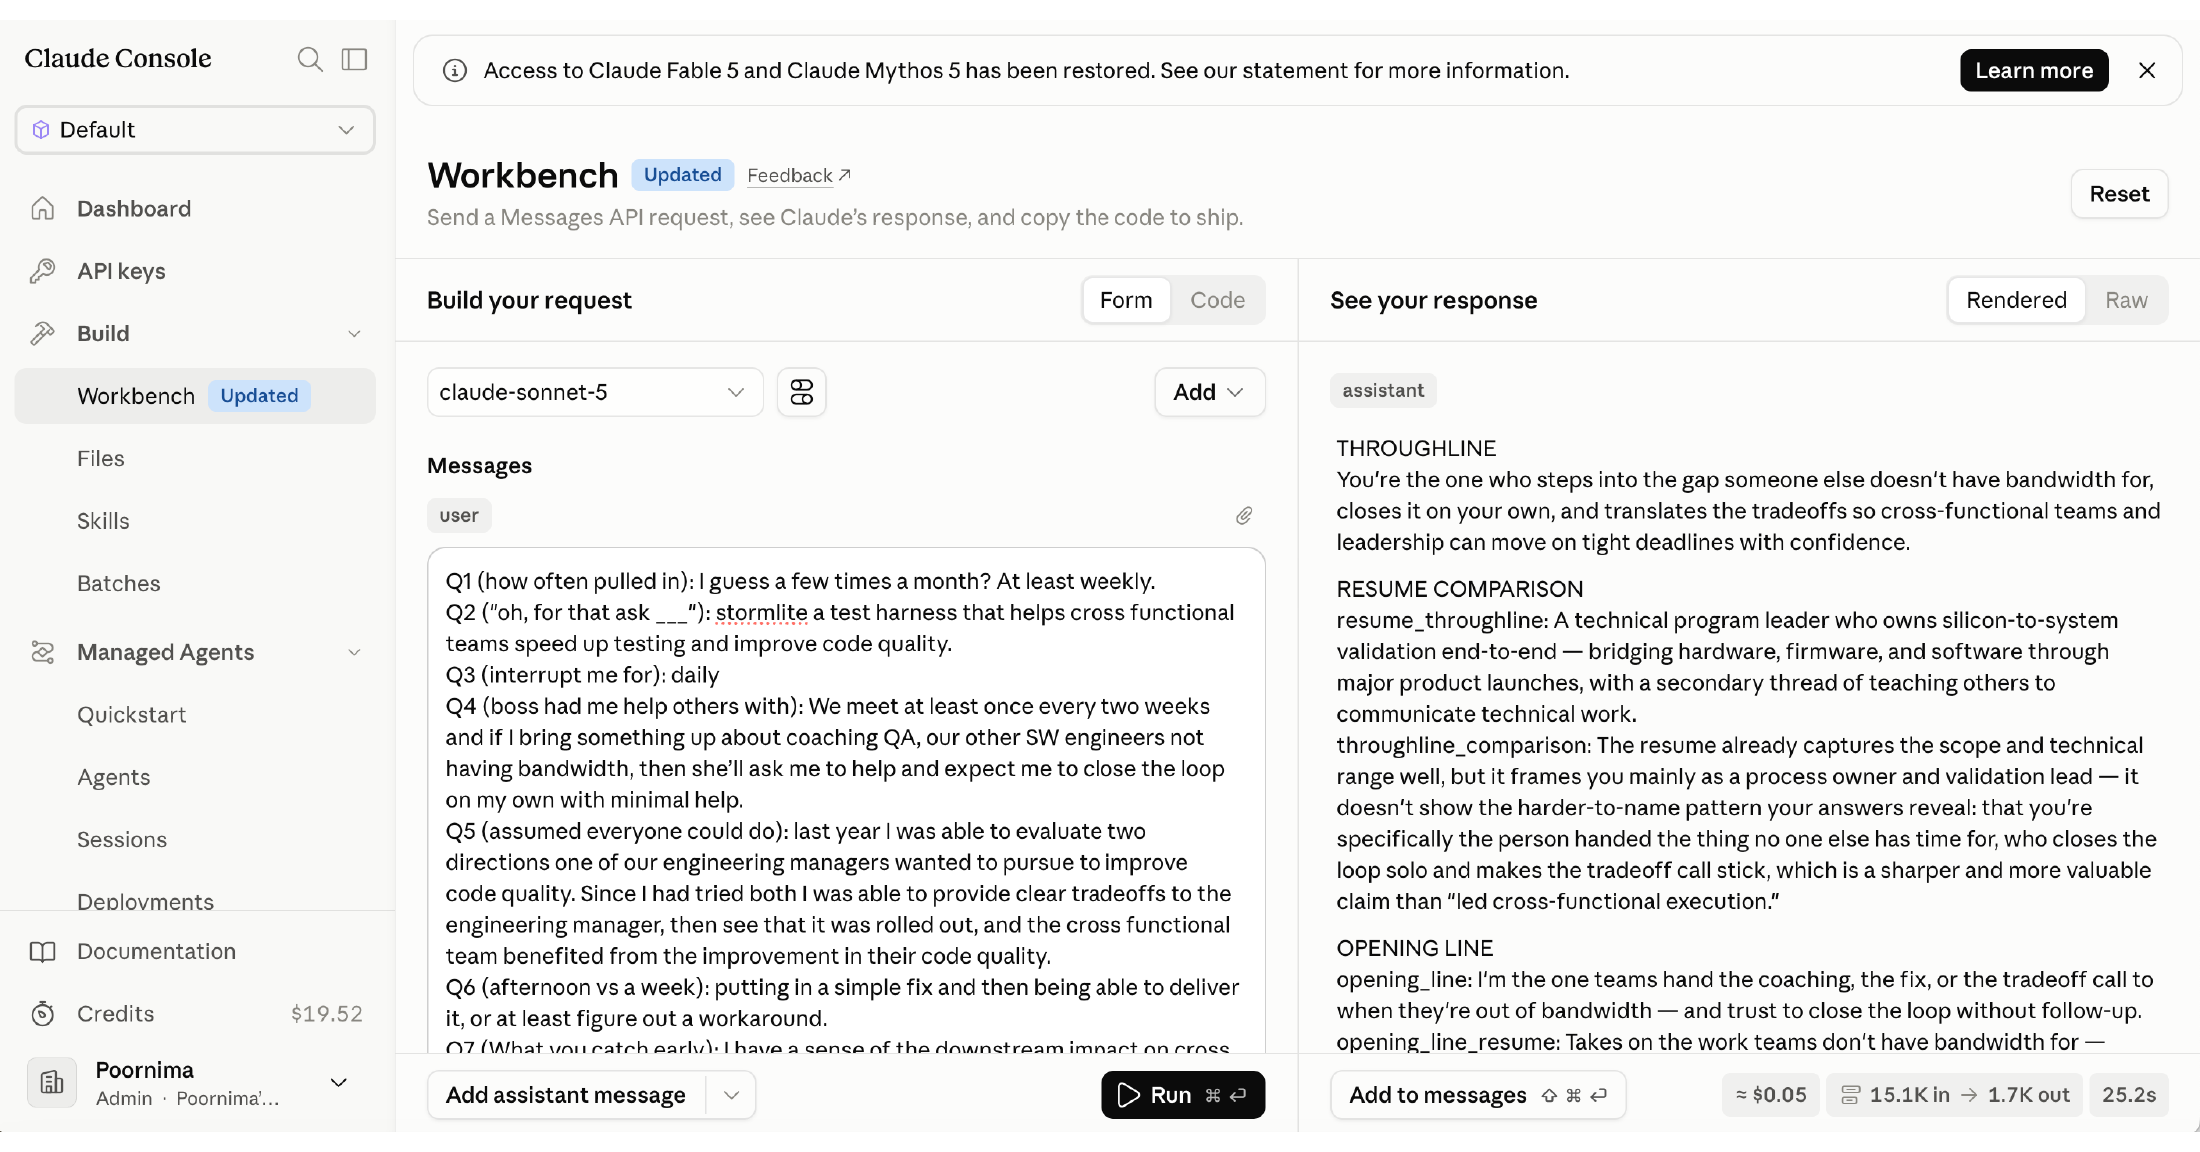
  • Think through the user input, and fill that in too. This is whatever a real person would actually type or provide — in our case, answers to the discovery questions.
  • Hit Run. Your output shows up in "See your response," on the right.
The Workbench Messages field filled in with real sample answers, and the generated response showing a throughline, resume comparison, and opening line.
Messages filled with real test input, and the generated response on the right — throughline, resume comparison, opening line.
I'd recommend testing with three different kinds of input to actually gauge quality: a rich answer set (thorough, detailed), a thin one (short, vague, half-answered), and your own real answers. If it holds up on all three, the prompt is solid enough to build around.
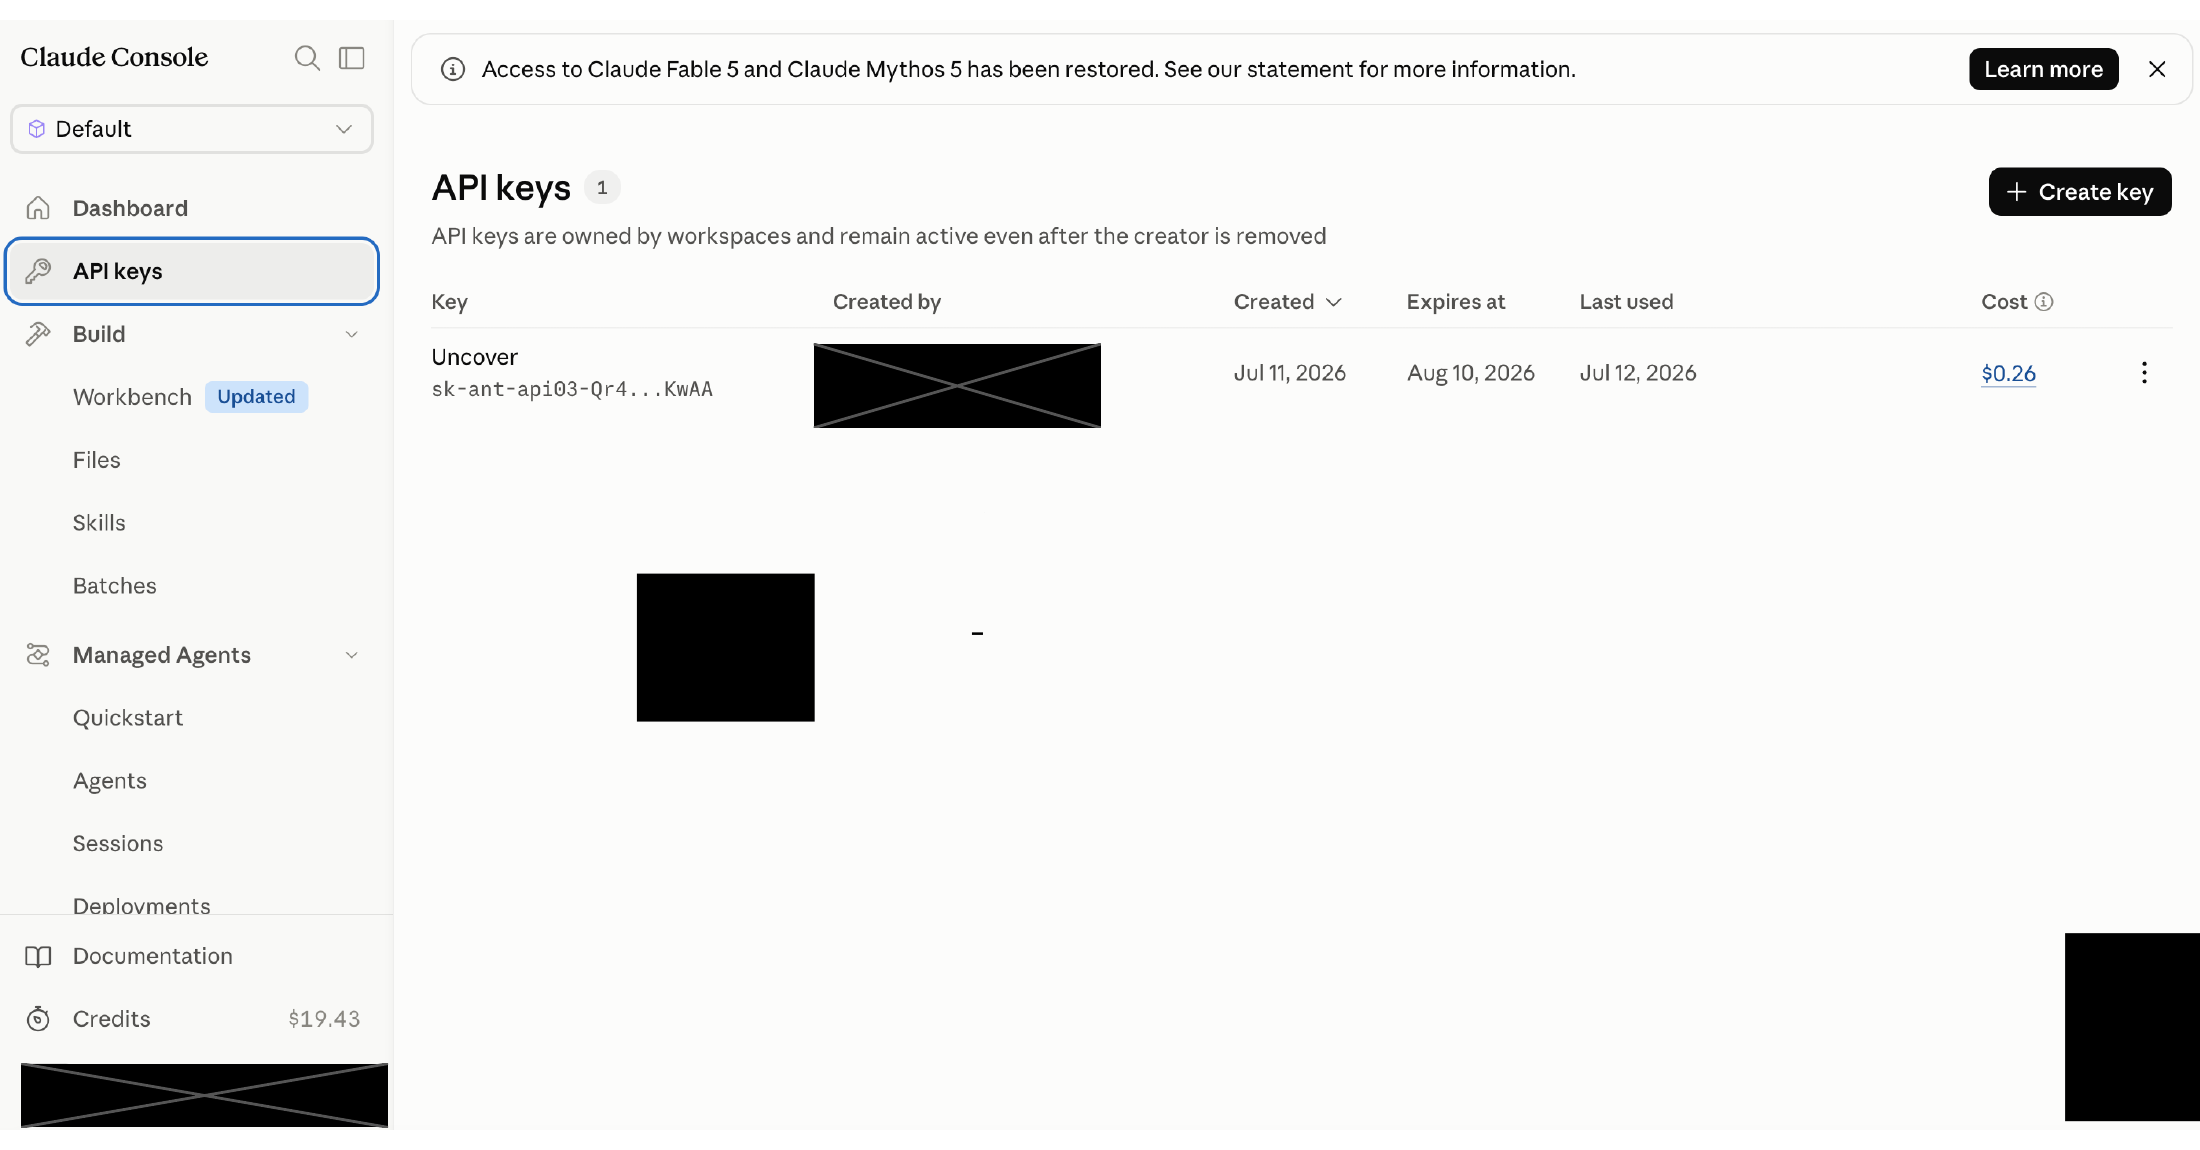
You only need an Anthropic API key if your app will use AI to process real input — not just to chat with Claude while building. Uncover takes in things like a resume and other user answers and has to call Claude to turn that into a profile, so it needed its own key.
The Anthropic Console API keys page, showing a key named Uncover with its cost tracked at $0.26.
API keys live in their own Console page — this is also where you'll see real cost tracked per key.
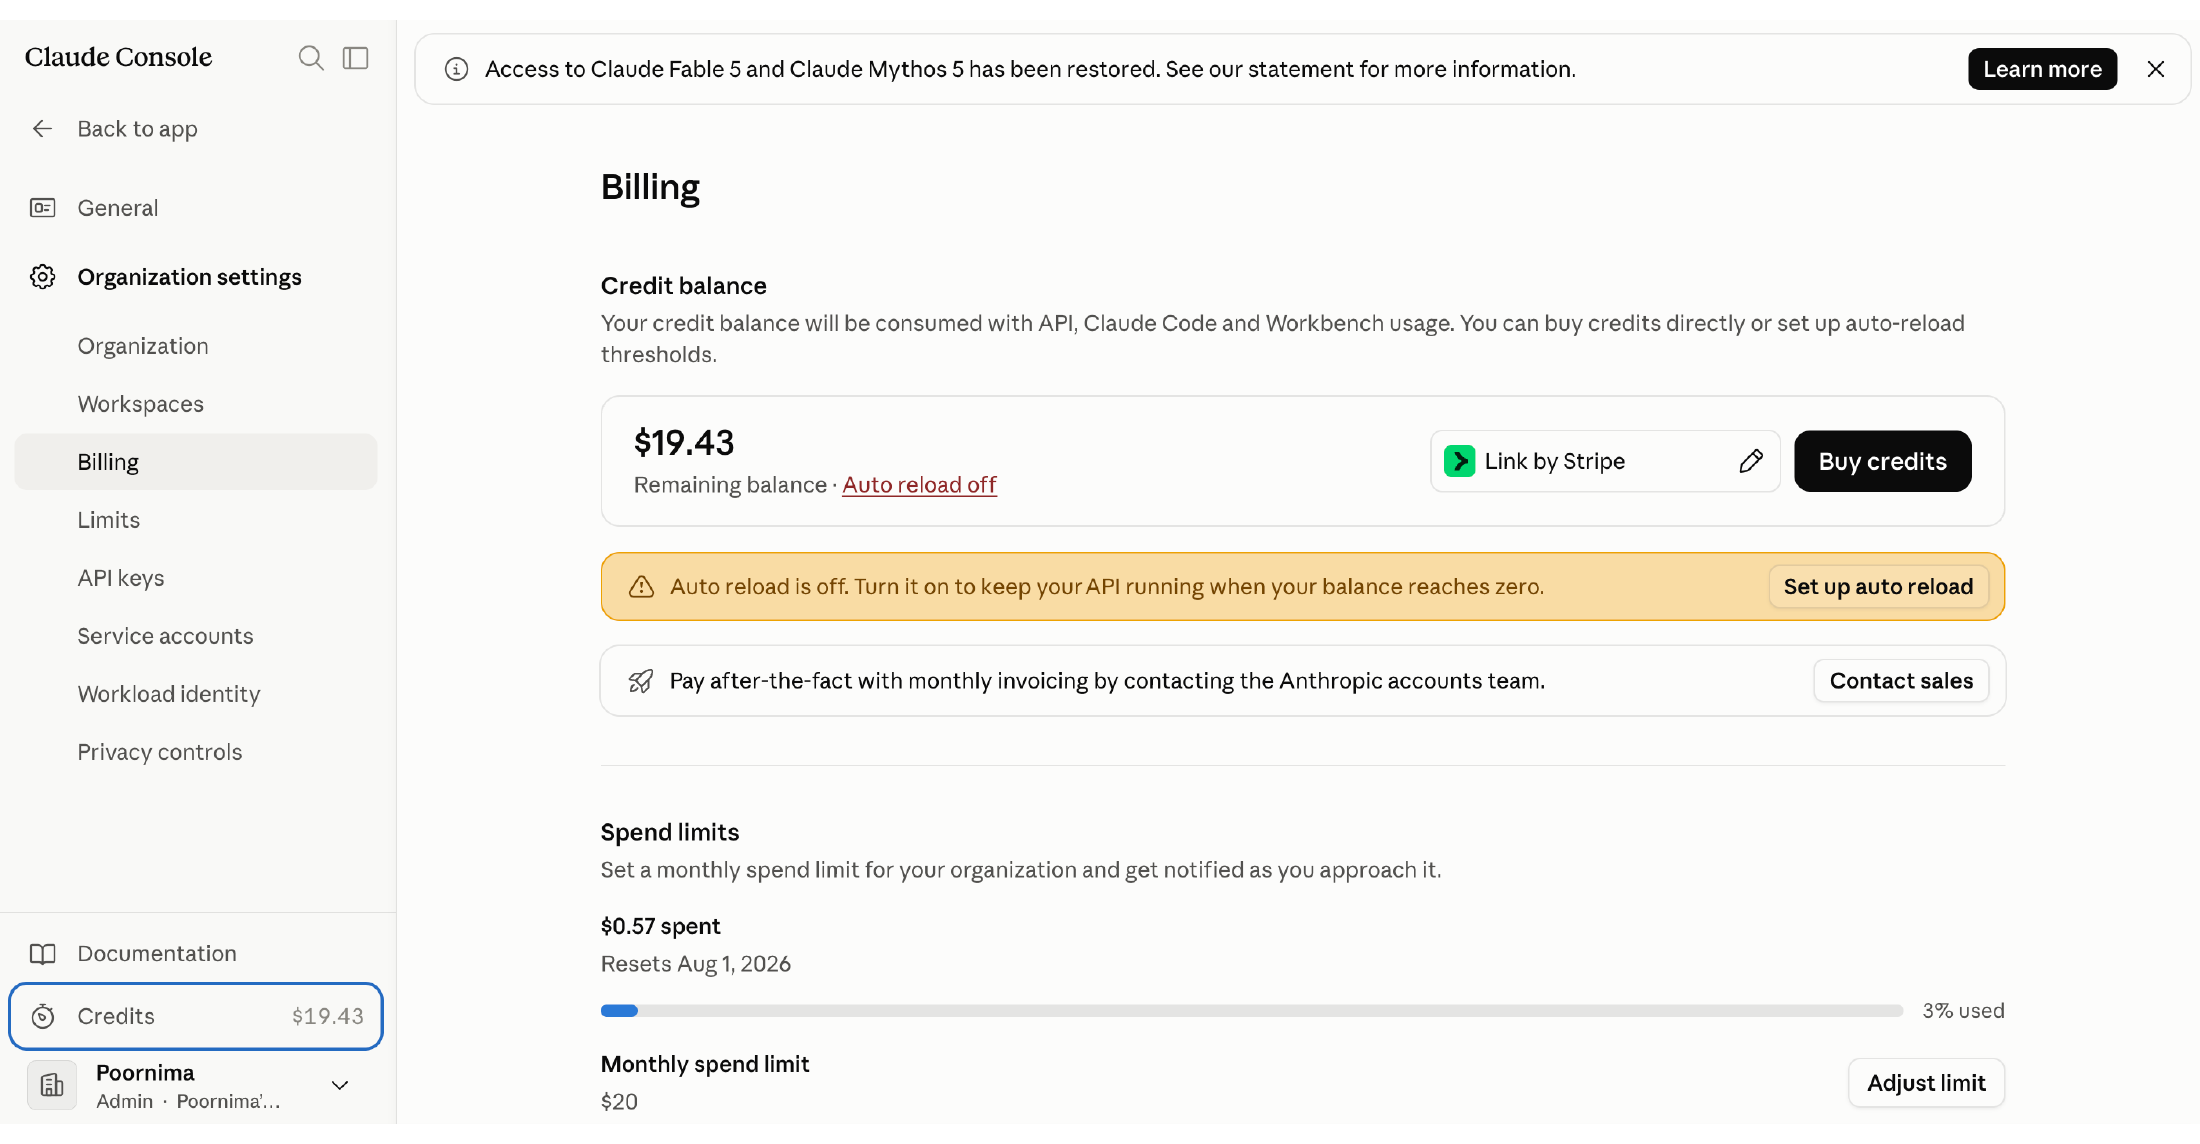
If you're going to make real API calls, you'll also need to add money — this is a separate spend from your Claude.ai chat subscription, billed on its own.
The Anthropic Console billing page, showing a $19.43 credit balance and a $20 monthly spend limit.
Billing lives under Organization settings — set a real balance and a spend limit here.
  • I set a $20 balance with a $20 monthly spend limit, plus notifications for when I start approaching it.
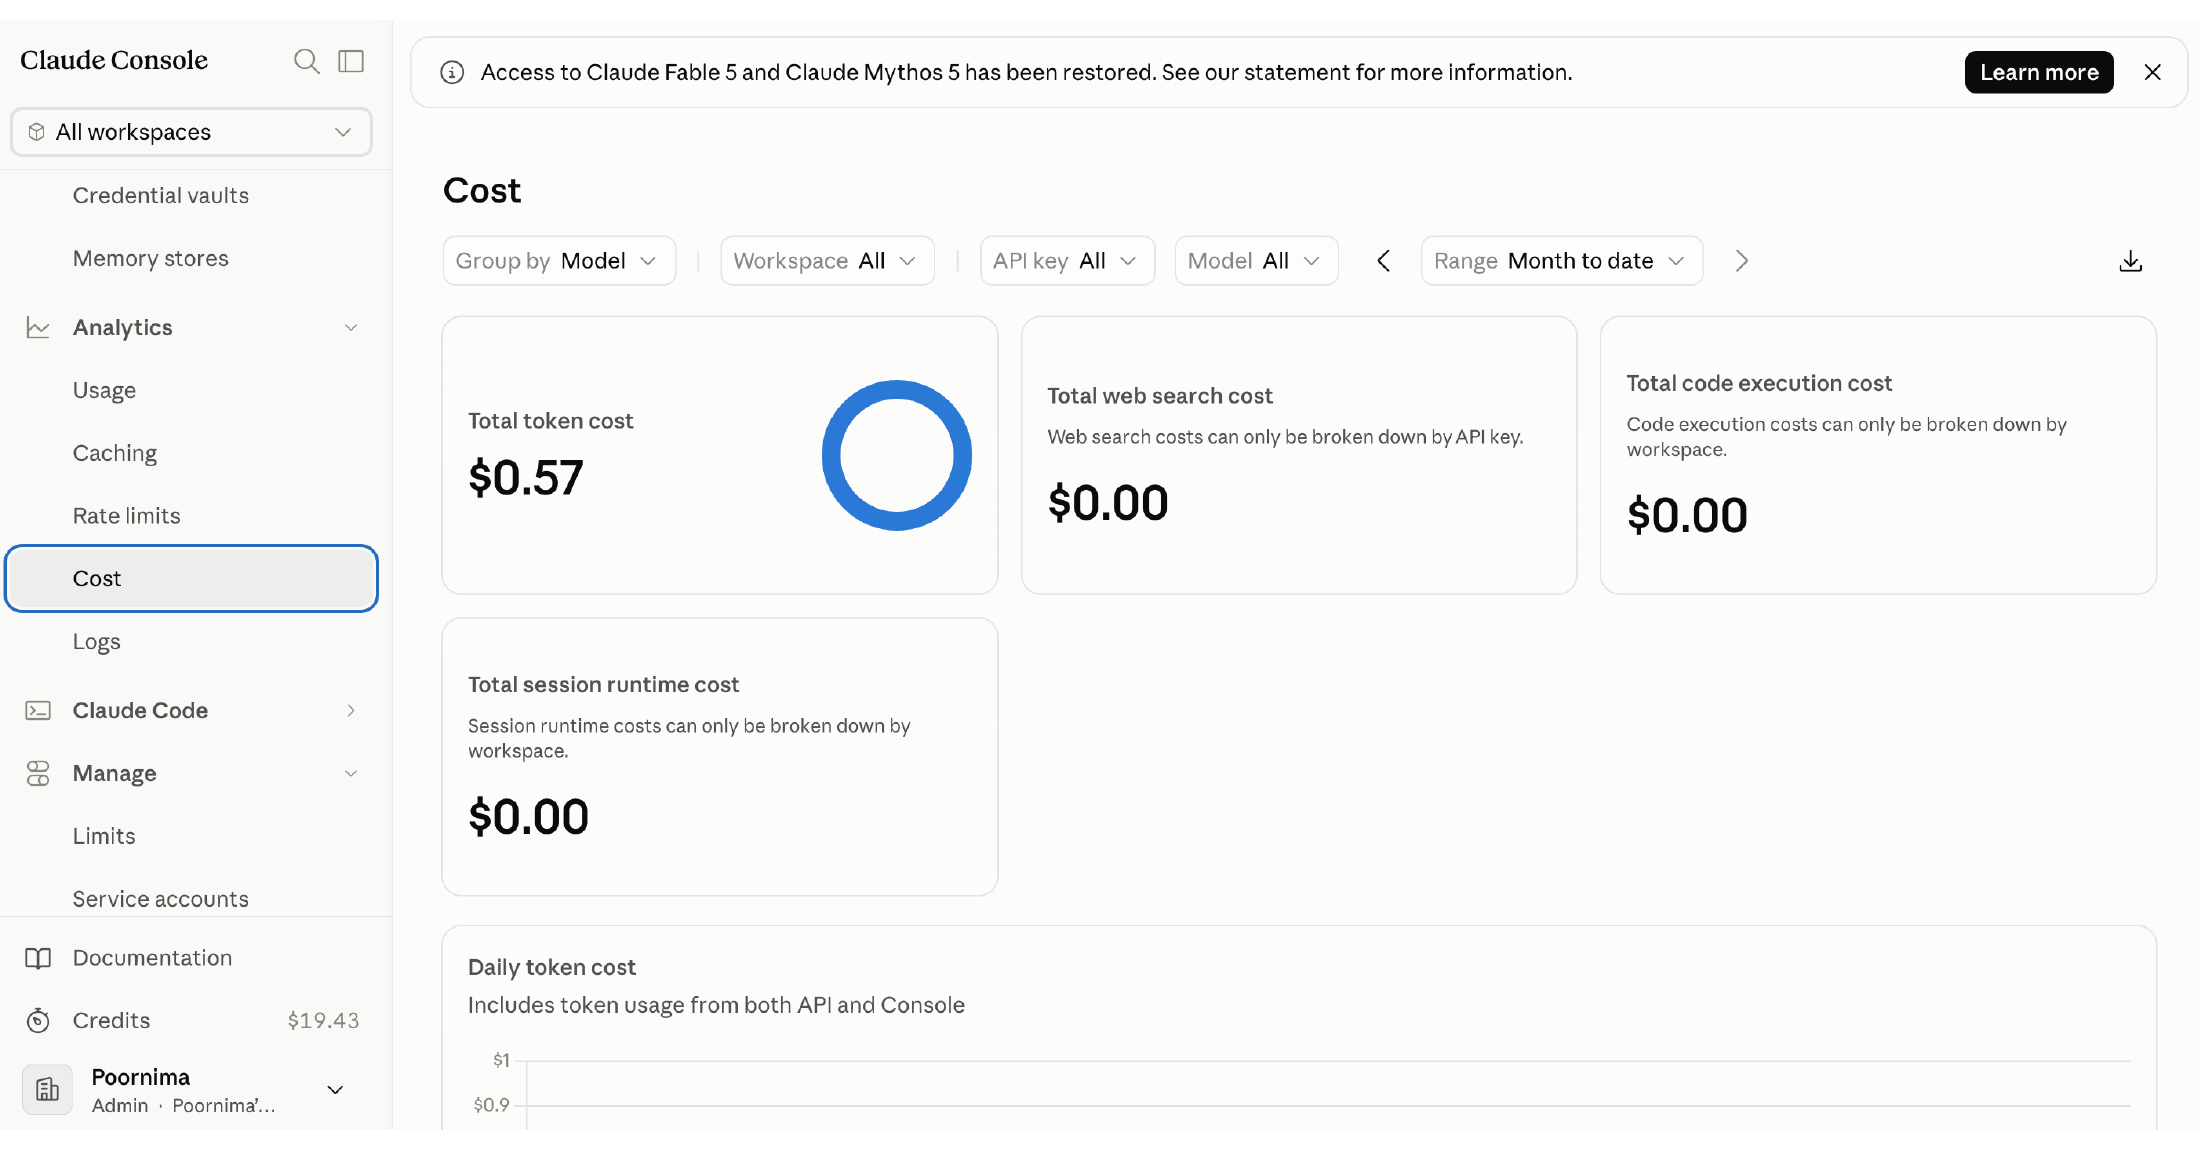
  • I'd recommend starting low. After all my testing, across this entire build, I only ended up spending a whopping $0.57.
The Anthropic Console cost dashboard, showing a total token cost of $0.57 for the month.
The Cost dashboard — this is where you'll actually watch that number stay small.
Finally, create an account at Vercel.
Vercel's homepage, showing marketing copy about agentic infrastructure for coding agents.
Don't let the "agentic infrastructure" messaging throw you — you're just here for free hosting.
Don't worry about it saying "agentic apps" everywhere — that's just Vercel's current marketing, not a requirement for what you're building. And if you already have a hosting tool you prefer, swap it in. I went with Vercel because it was easy, and free for what I was building.
Schema, the locked prompt, a deterministic fallback template, input guards, cost logging.
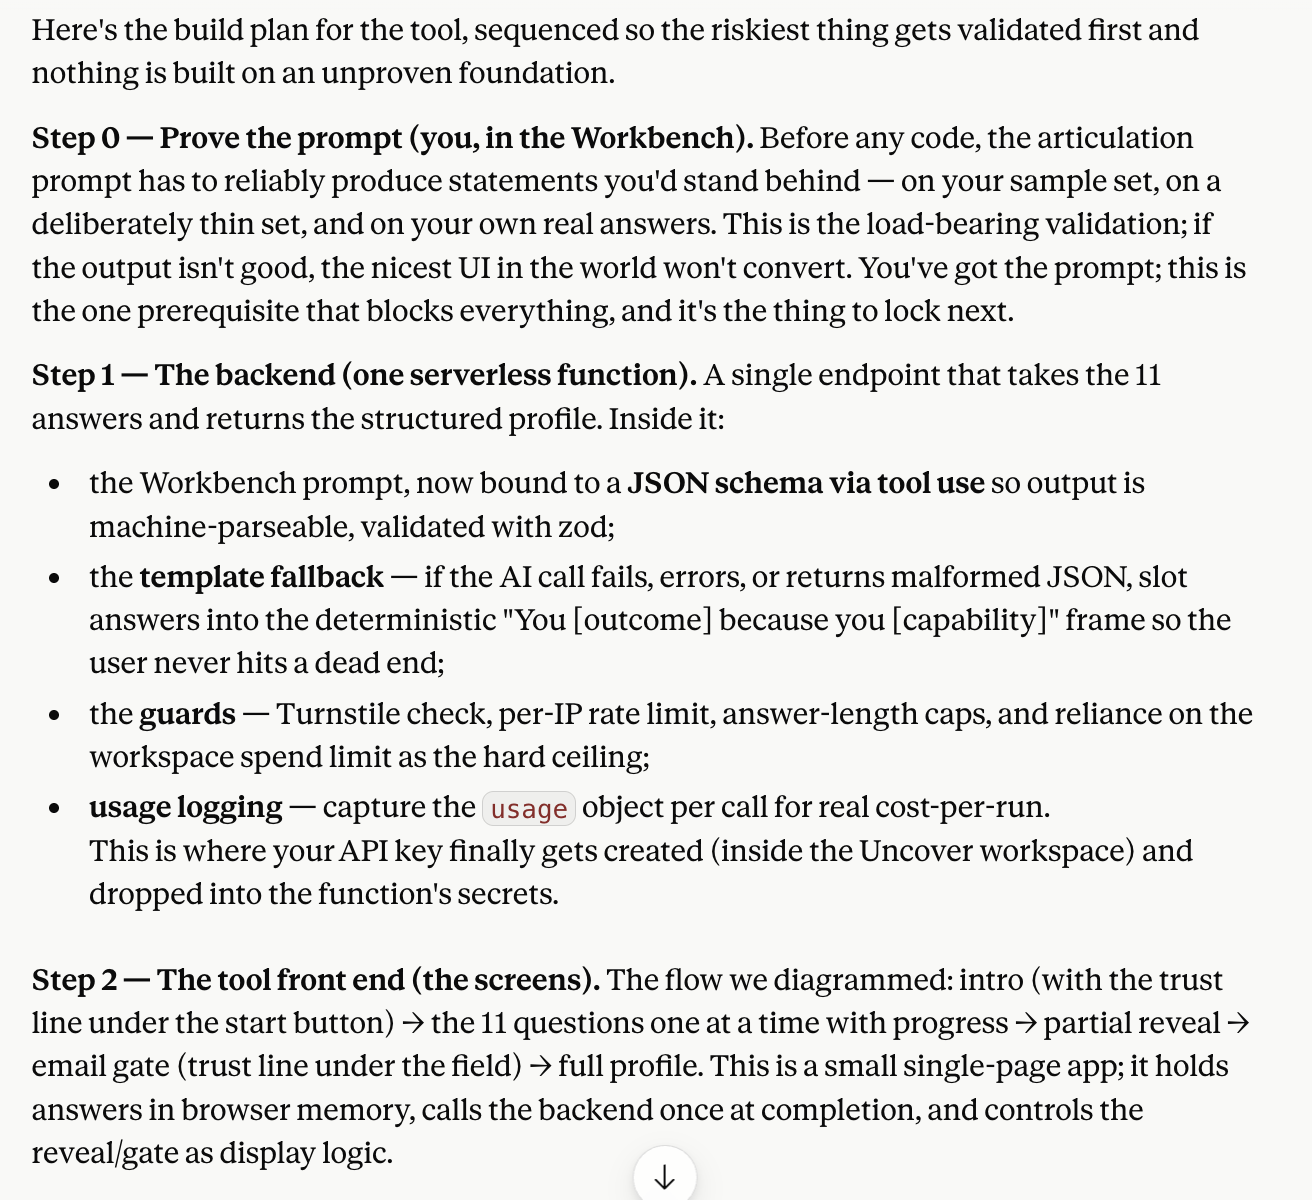
  • Ask for a build plan again, sequenced by risk. Same discipline as before, now applied to the actual code: the riskiest thing gets validated first, so nothing gets built on an unproven foundation.
A sequenced build plan: Step 0, prove the prompt in the Workbench; Step 1, the backend as one serverless function with a JSON schema, template fallback, guards, and usage logging; Step 2, the tool's front end screens.
The build plan, sequenced so the prompt (the riskiest, least certain part) gets proven before any backend code exists.
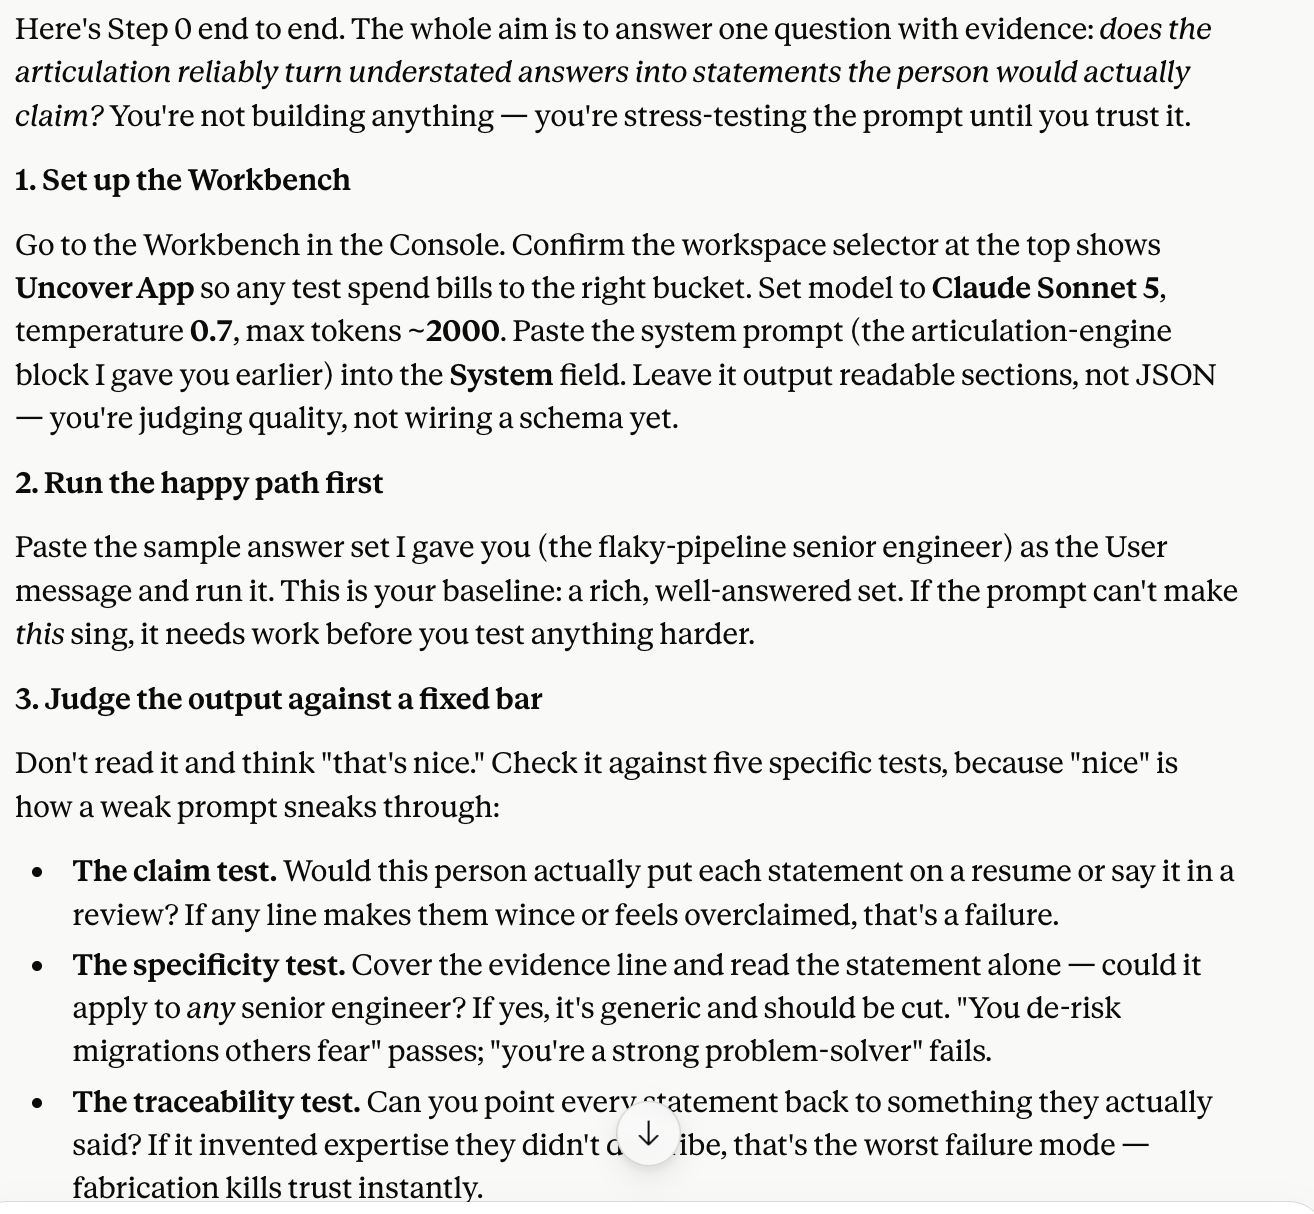
  • When something felt missing, ask for that one step in more detail. Rather than re-explaining the whole plan, I'd point at a single step and ask it to walk me through that one end to end.
A detailed, step-by-step walkthrough of Step 0 — setting up the Workbench, running the happy path first, then judging the output against five fixed tests: the claim test, the specificity test, and the traceability test.
Zooming into just one step — this is also where the failure cases and fallback mechanisms actually got worked out.
I don't trust prod, and I like a testing environment from day one. It's easy to fall into build, build, build — but the loop that's actually served me over the years is build, test, iterate, take a break, repeat. This step is where that loop starts.
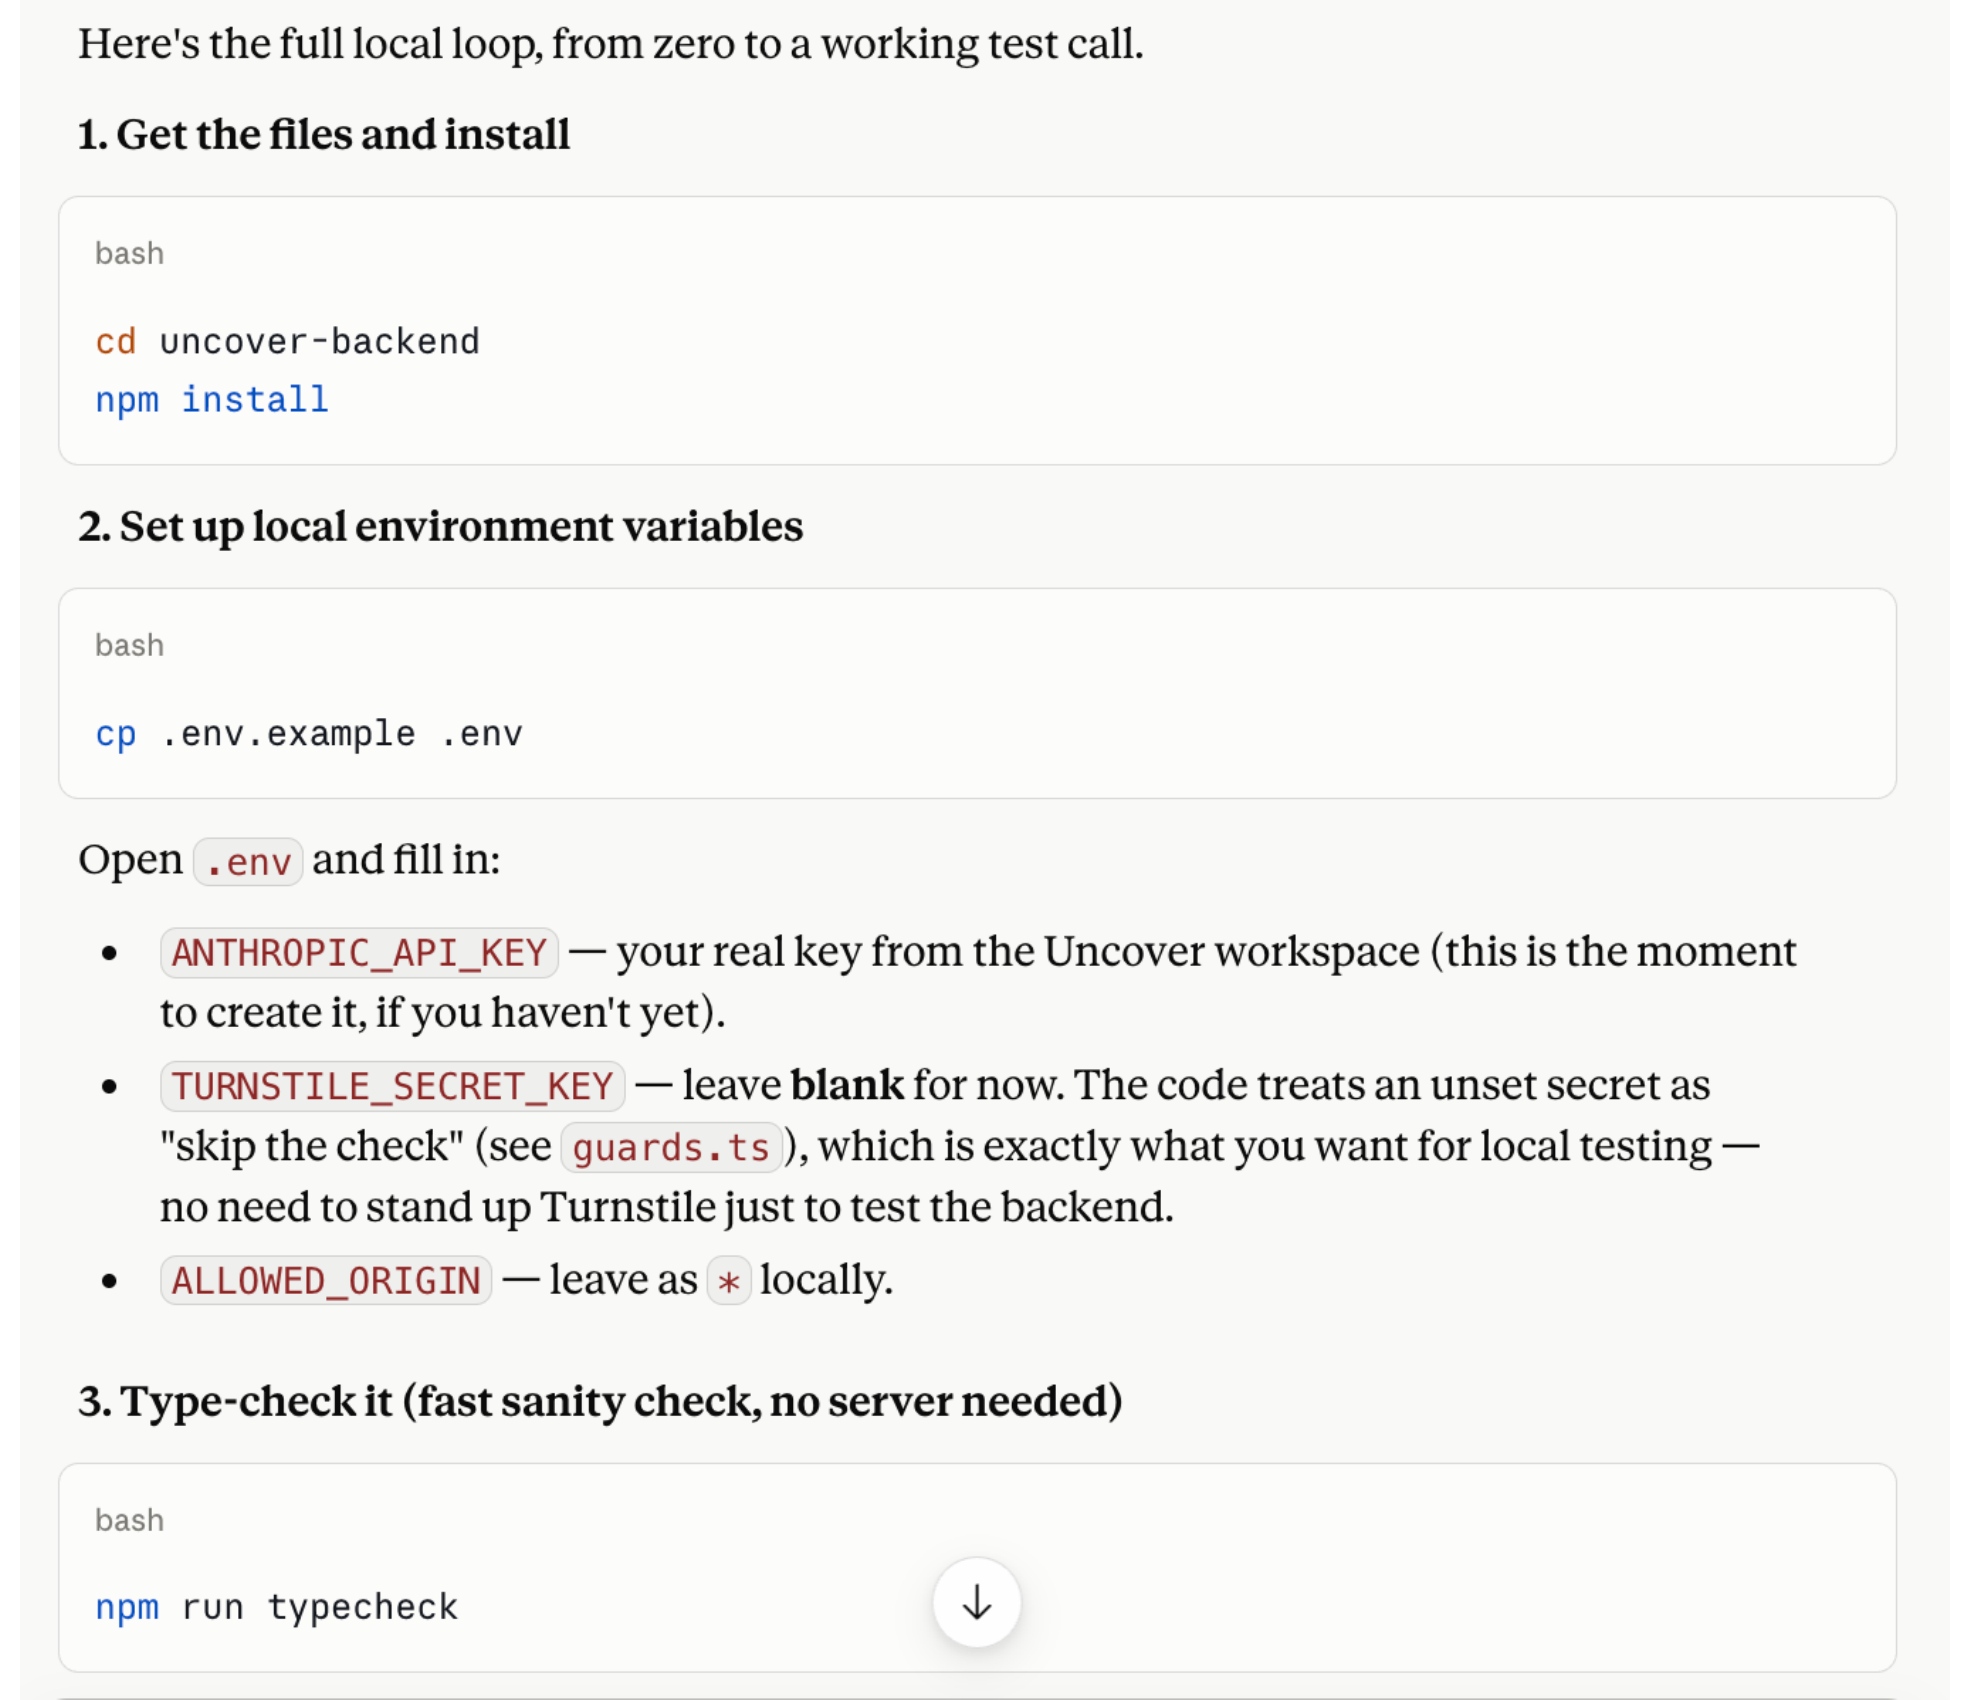
  • Get the local environment running. Install, set up local environment variables, and type-check it — all before any real request touches it.
Terminal commands for the local install: cd into the project, npm install, copy the .env.example file, fill in the API key and other environment variables, then run npm run typecheck.
Zero to a working local setup — install, environment variables, a type-check as a fast sanity check before anything runs for real.
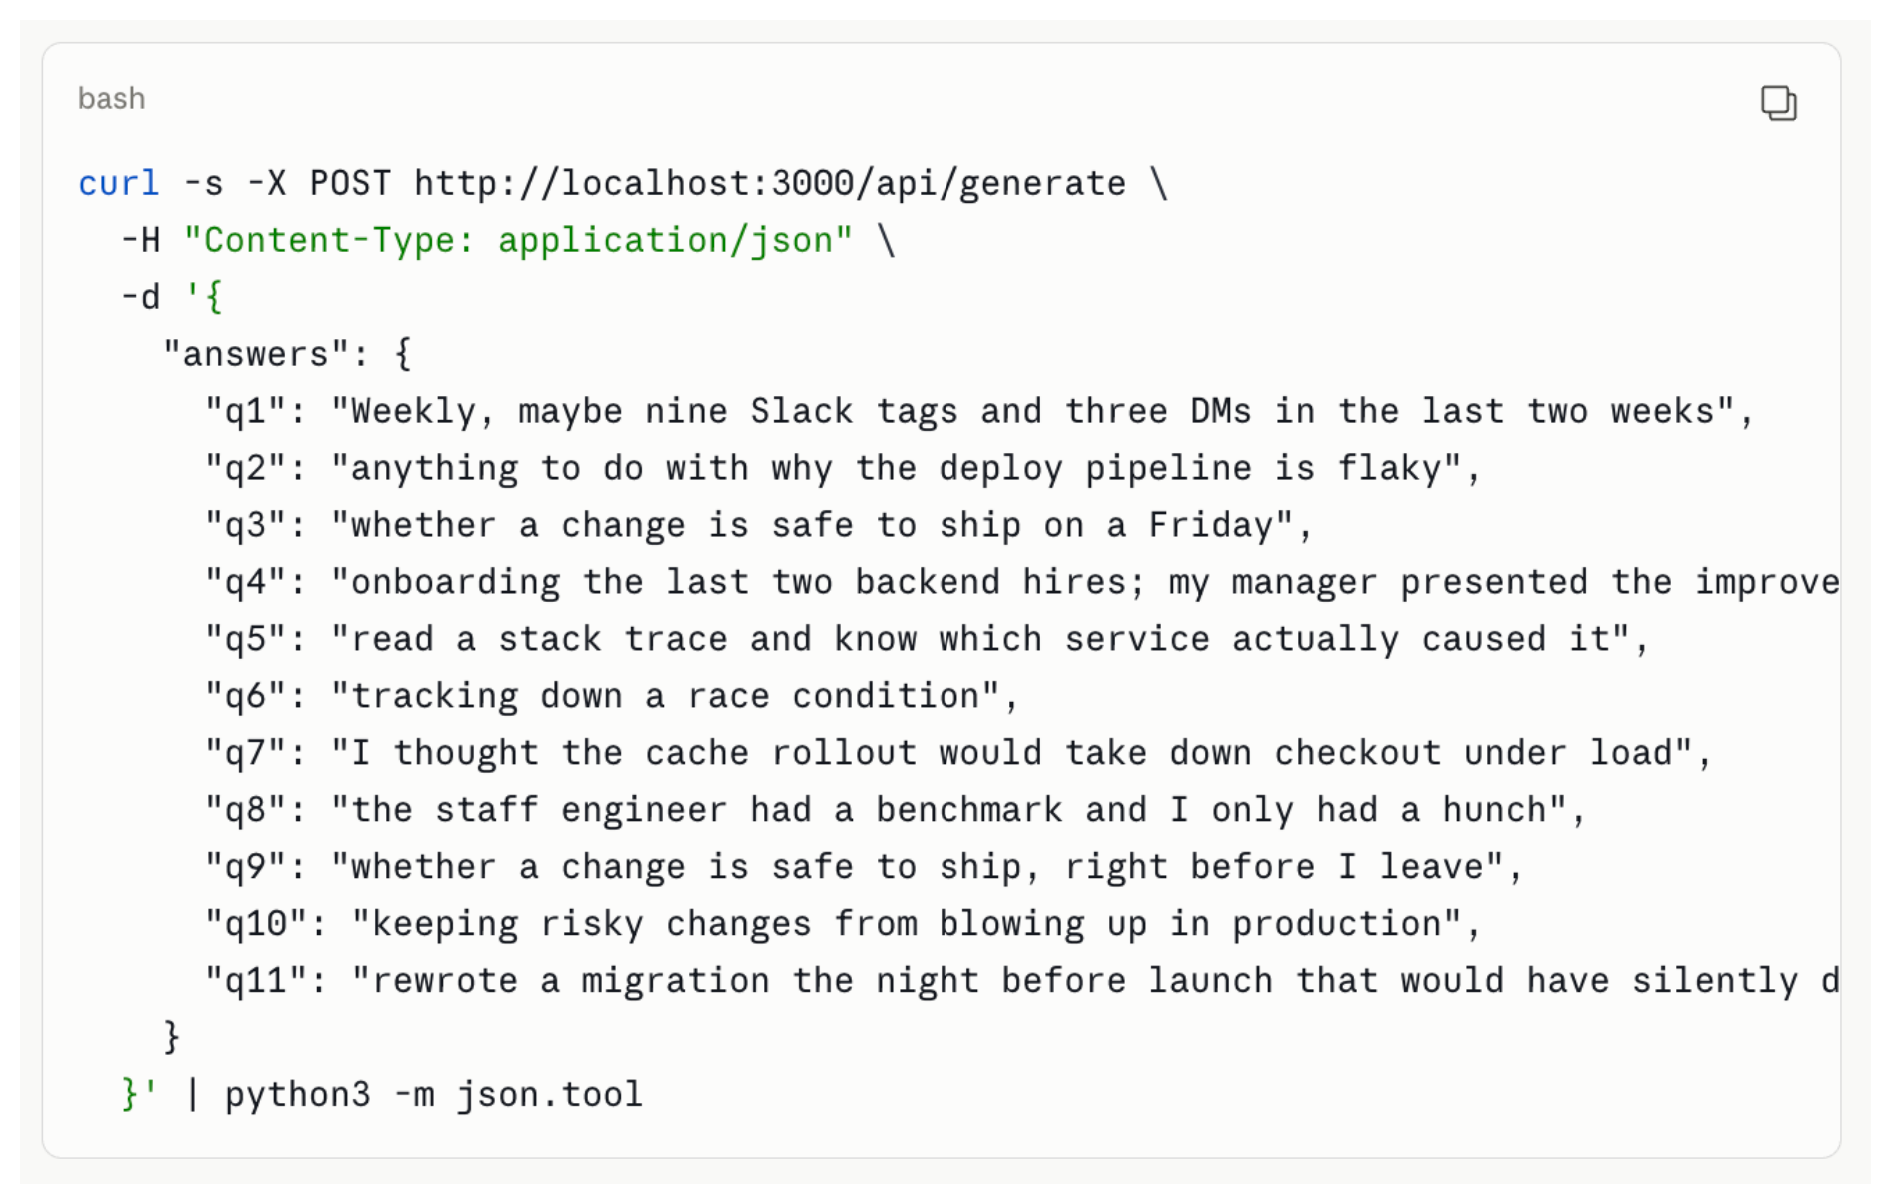
  • Then actually hit the endpoint. A real curl request, with real sample answers, against localhost — confirming both the AI path and the fallback path work before any of it is live.
A curl command posting sample answers to the local endpoint at localhost:3000/api/generate, piped through python3 for readable JSON output.
The actual test call — real answers, against your own machine, before anything touches production.
This is a good time to capture all the files Claude has sent over into GitHub, so everything's version controlled in case you want to iterate further later. (Assuming y'all know how this works, so I'll skip going into too much detail here.)
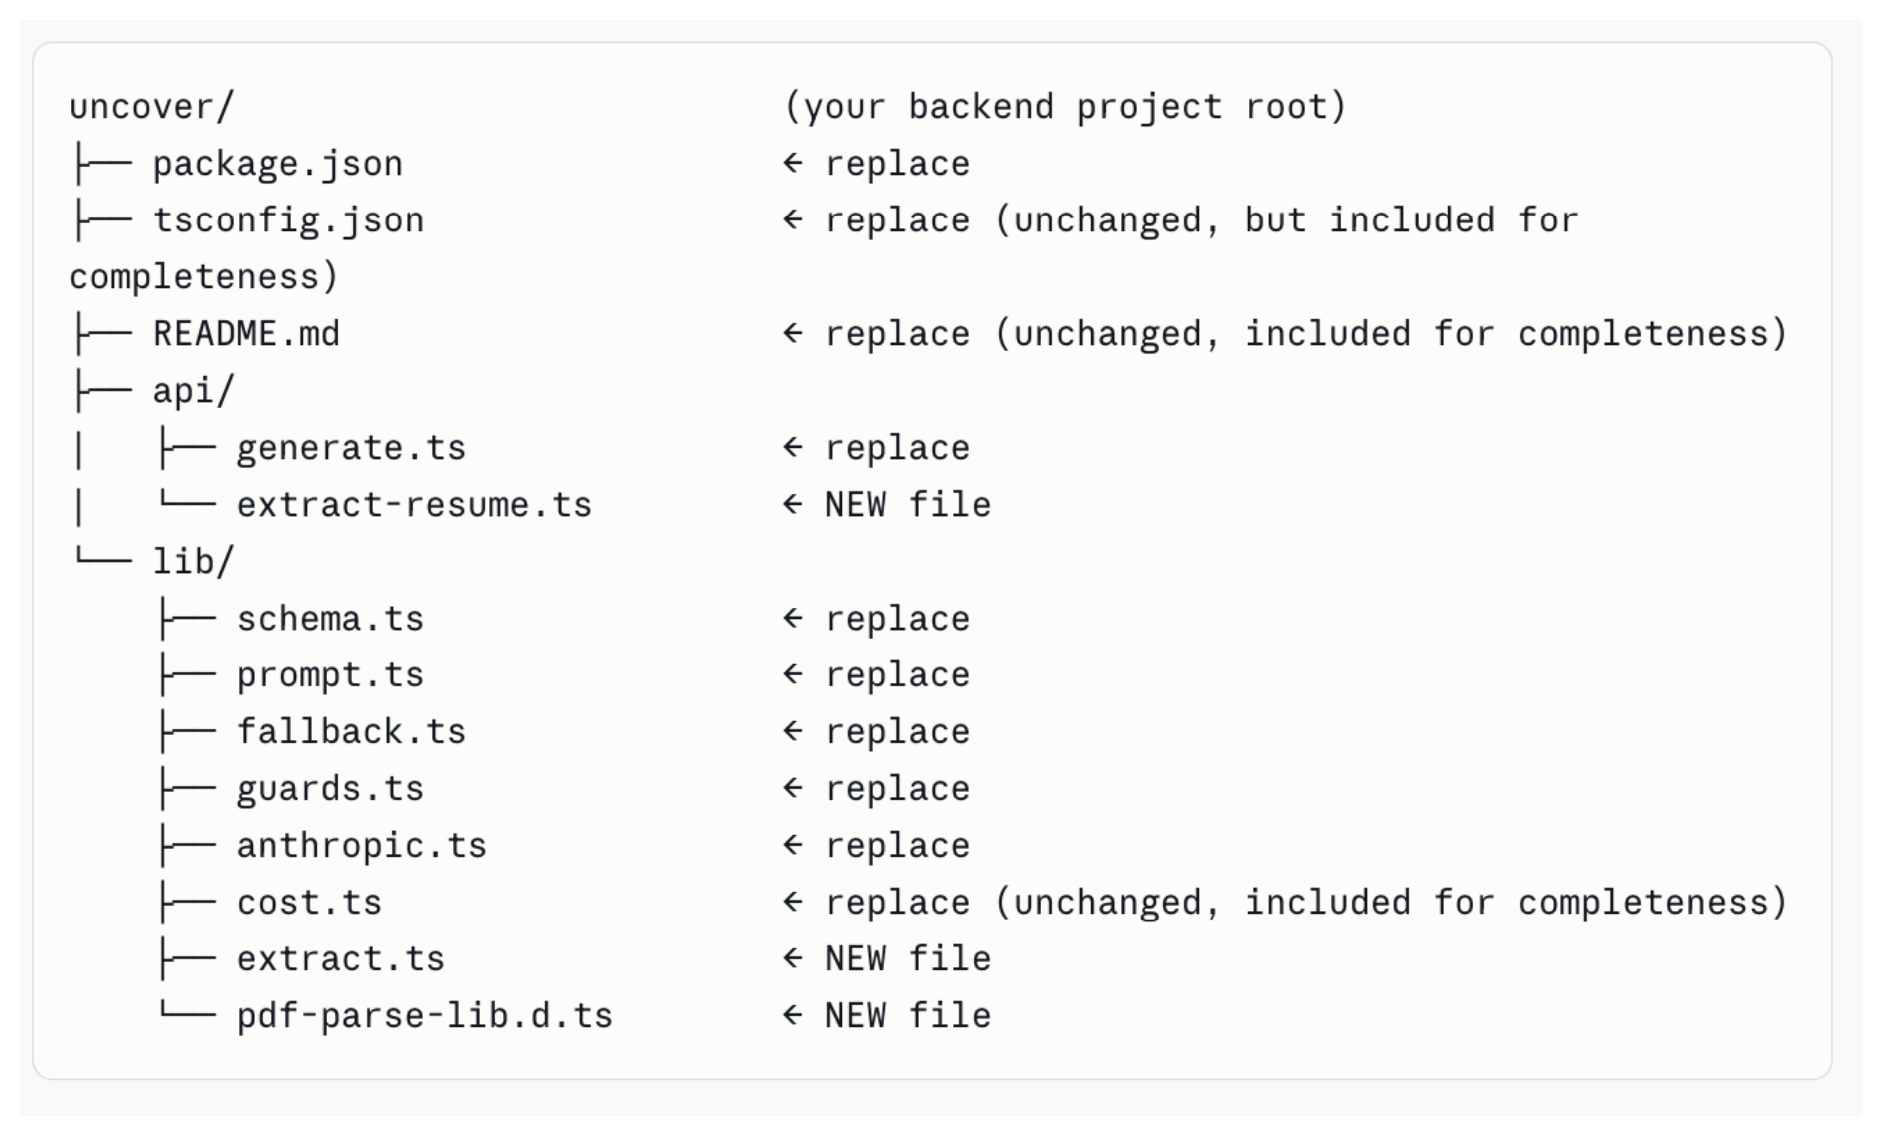
  • Ask Claude for a full file list first. Before pushing anything, I had it list every file in the project — which ones were new, which were unchanged, which needed replacing — so nothing quietly got left out.
A file tree for the Uncover backend project root, listing package.json, tsconfig.json, README.md, api/generate.ts, api/extract-resume.ts, and lib files including schema.ts, prompt.ts, fallback.ts, guards.ts, anthropic.ts, cost.ts, extract.ts, and pdf-parse-lib.d.ts — each marked as replace, new file, or unchanged.
The full file list, each one marked replace / new / unchanged — the checklist before anything gets pushed.
vercel --prod, then chase down the environment-specific bugs that never show up locally.
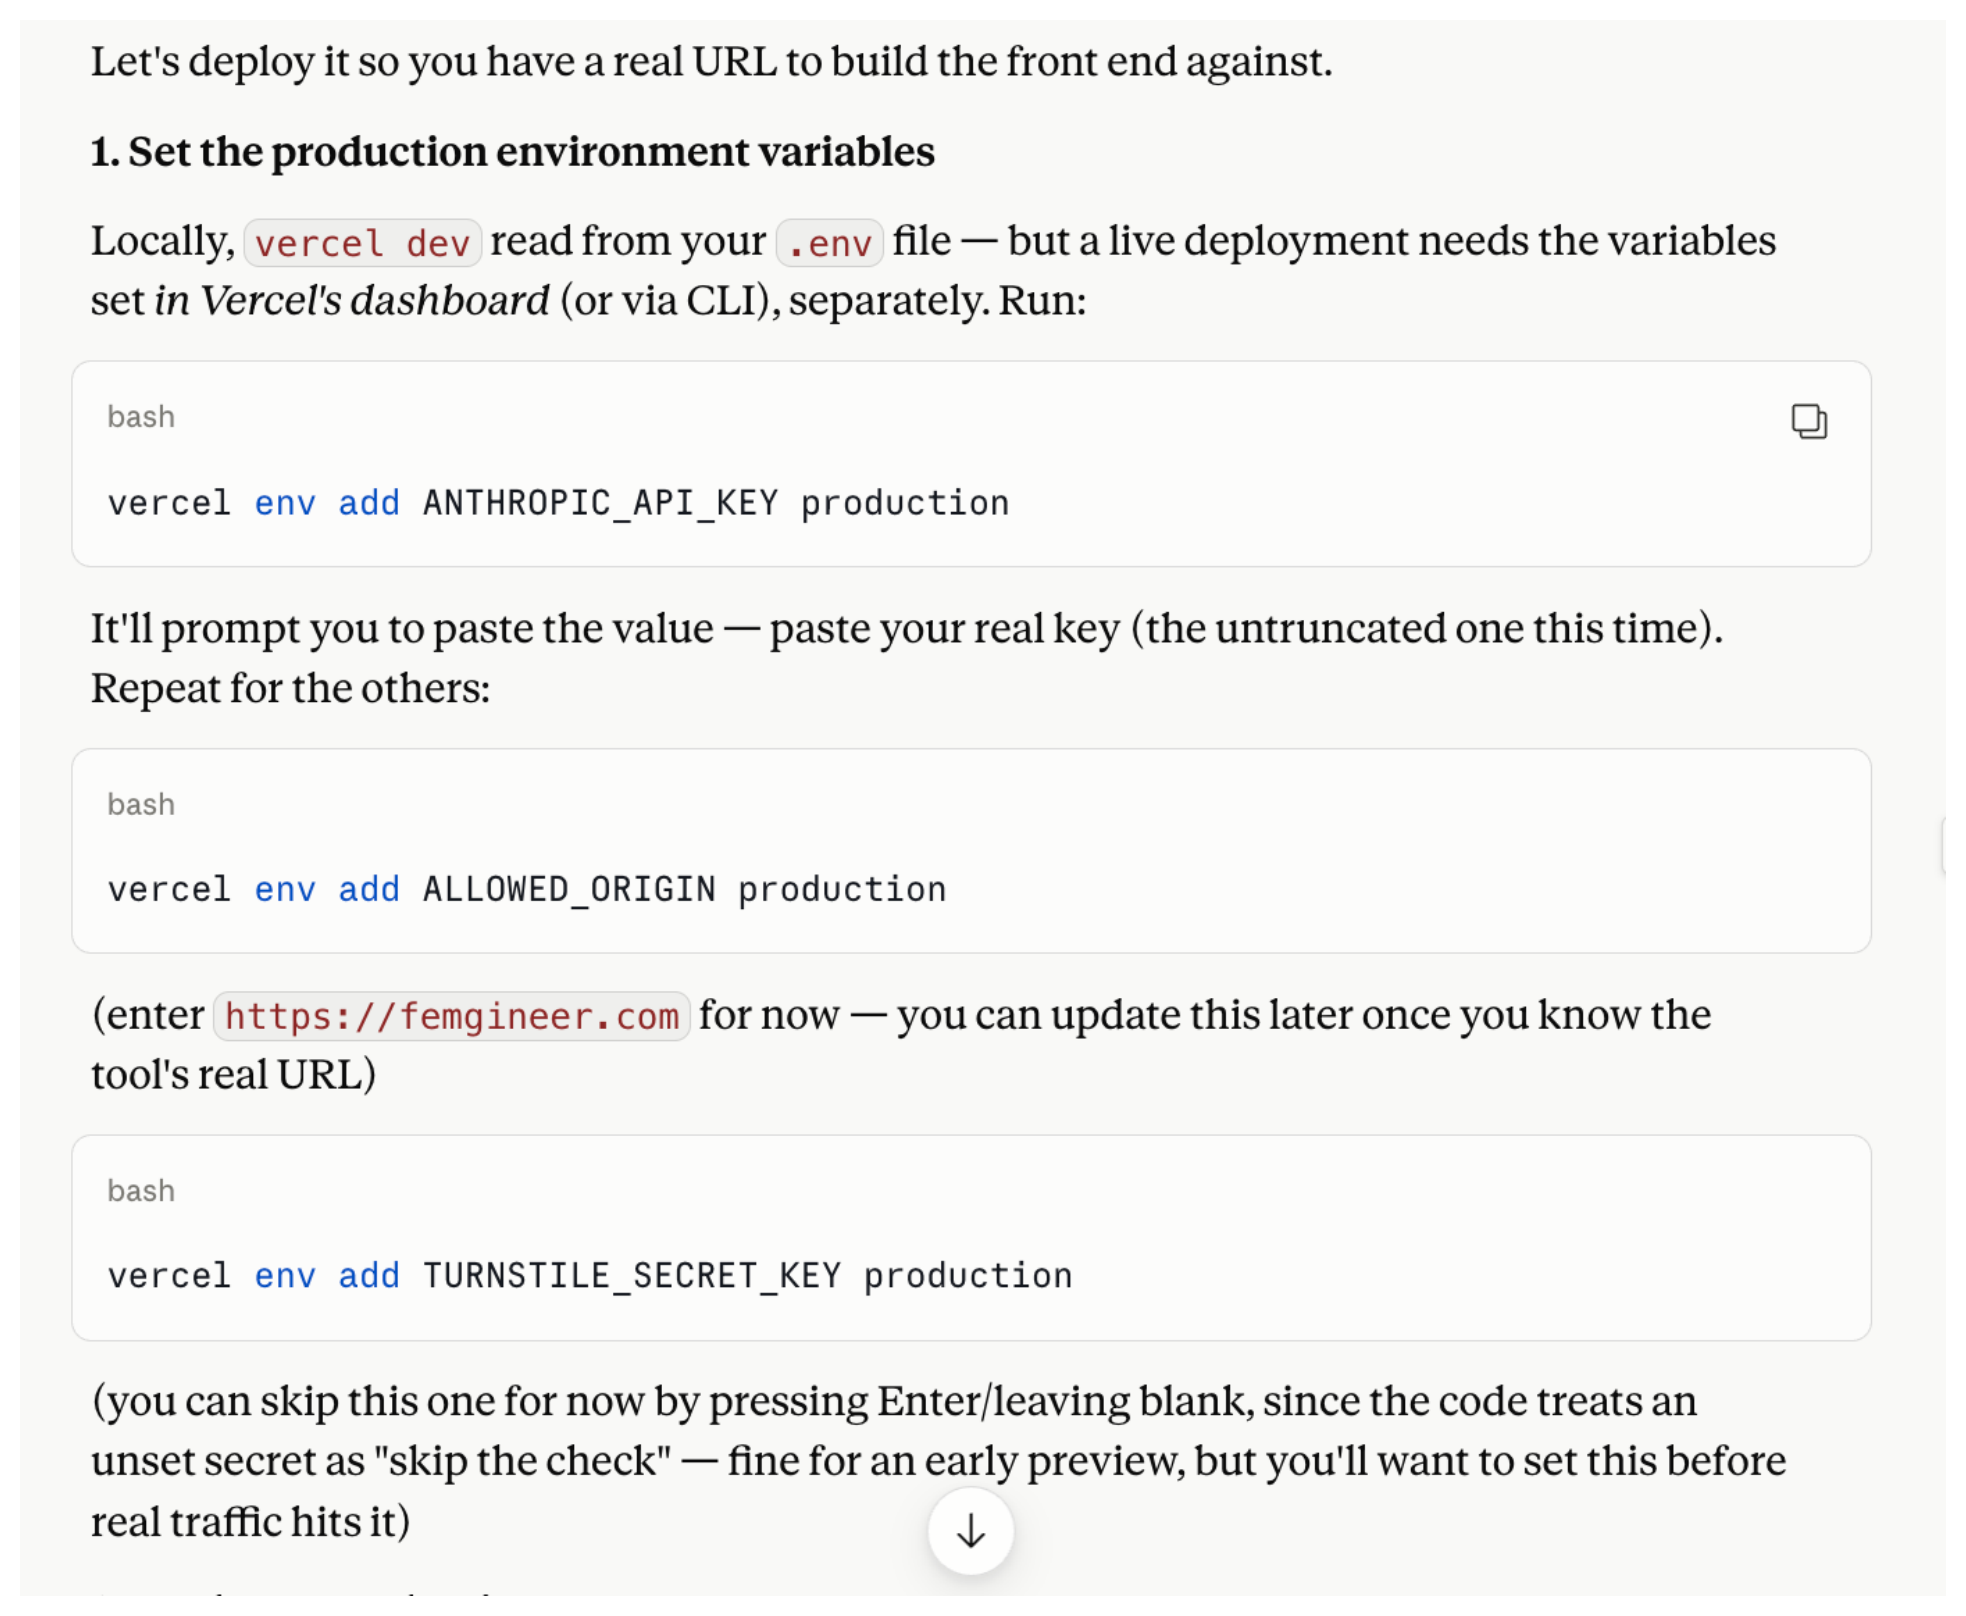
  • Get the production environment variables set. A live deployment needs the same variables your local .env had, but set in Vercel's dashboard (or via CLI) instead — including your real, untruncated API key this time, and your tool's real URL for the origin check.
Terminal commands using the Vercel CLI to add production environment variables: vercel env add ANTHROPIC_API_KEY, ALLOWED_ORIGIN, and TURNSTILE_SECRET_KEY, each scoped to production.
Setting the same variables again, but for production this time — this is also where the real, untruncated API key goes in.
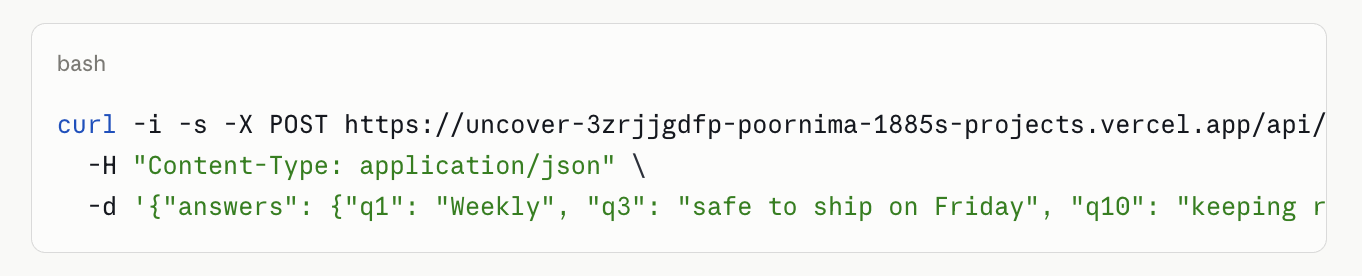
  • Then curl it again — this time against the real URL. Same test as the local loop, just pointed at the live endpoint, to confirm the deployed version actually behaves the same way the local one did.
A curl command posting sample answers to the live Vercel deployment URL at /api/generate, the same test as the local version but against production.
The same test call, now against the real, deployed URL.
Gotcha: Vercel's function logs are where the real error lives. A fallback firing tells you something broke — not why. The actual reason (a timeout, a bad key, a missing env var) is a separate log line you have to go find.
Gotcha: Vercel's Deployment Protection can silently block your own live API. A setting meant to keep preview URLs private can also 404 your production endpoint until you turn it off or scope it to previews only.
My primary background is backend software engineering, so I like to iterate there first — until the workflow and the output feel right — before touching the frontend at all. Iteration is just cheaper on the backend: no design decisions to second-guess, faster to change your mind. It also makes the workflow and value prop clearer once you do hand it to Claude to build the landing page and UI. That's the order that worked for me — not a rule. If you're stronger on the frontend, or just think better in a UI, you might reasonably prefer the reverse.
  • Once the backend workflow felt right, I had Claude create both frontend assets: a landing page, and then the tool itself — the actual thing people interact with.
Wired to the live backend URL, no separate server to manage. This step should be fairly straightforward, but if it isn't: ask Claude to create both frontend assets first (the landing page and the tool), then deploy both to a hosting site.
  • You have real options for where "hosting" means. It could be wherever your domain already lives — I use Bluehost for mine. Or you can skip that entirely and just use Vercel's free tier to host both, same as the backend.
Domain (URL)
Landing page
Tool
Backend app
A real run, checking logs for success, real token usage, and real cost-per-run.
Gotcha: open the browser inspector early. When a request fails silently, the Network tab's status code and response body tell you more in ten seconds than guessing does for ten minutes.
You built something real, end to end, in the cracks of a weekend. Go do something completely unrelated to celebrate — I took my kids bowling for the first time. None of us were any good at it, and that was kind of the point. (Though I did score a 99 — beating my father-in-law, which I will absolutely be bringing up again.)
Once you've actually taken the break — not "I'll rest after just one more thing" — come back and look at it with fresh eyes. For me, that's continuing to sharpen the value proposition itself, and considering wiring up a few third-party services to support things the weekend version deliberately skipped: real email delivery, and saving a profile somewhere, without reaching for a full SQL database to do it.

Real numbers, one weekend's worth

This is the shape of the cost for a stateless serverless app like this one — mostly free, with one line item that scales with real usage.

Hosting the app
$0
Vercel's free Hobby tier covers this comfortably at this scale.
Source control
$0
GitHub, free tier.
Domain
from ~$1
Namecheap or similar, more depending on length and TLD.
Claude, building it
$20–100/mo
Pro covers most sessions; Max if you're building for hours at a stretch.
AI API calls
~$0.02–0.04 / run
Set a hard monthly spend cap. This is the one cost that scales with usage.
Everything else
$0
Bot protection, fonts, and the open-source libraries all cost nothing at this scale.

Not a straight-through weekend — real, interrupted time

These are honest estimates, not a stopwatch total. Most of it happened in short, real windows — not one clean sitting — which is closer to how most people will actually build something like this.

Day 1
~3–4 hours
Strategy, design, prompt validation, and the initial build — spread across whatever windows the day actually offered.
Day 2
~2–3 hours
Debugging, performance tuning, and feature refinement the next morning.
Total
~5–7 hours
Across two days, in pieces — not a single uninterrupted sitting.

Debugging techniques

The gotchas from this build, walked through in full — module resolution errors, deployment protection, environment variables, and the timeout math that actually explains a slow response.

Stuck on any of this, or just want to say hi? Ping me directly — help@femgineer.com or on X, @poornima.


The real reason I gave myself this weekend

A few posts back I wrote about just-in-time learning — that you don't need to learn everything, just enough to stay ahead, and that it's fine to be a season late. Then I wrote about role clarity — that nobody's coming to hand you a roadmap, you have to generate it yourself. I wanted to actually test both of those on myself, out loud, instead of just writing about them. So I gave myself five honest questions and one weekend to answer them.

What could I build in the cracks of a weekend?

Turns out, more than I expected — a working prompt, a backend, a landing page, and a real deployed tool. Not because I had more time than usual. I had less. Between nap times and after-bedtime, the actual work happened in maybe five to seven real hours, not one clean sitting. If it can get built in the cracks like that, the excuse of "I don't have time" gets a lot smaller.

How much would it cost?

Close to nothing to host, and pennies per use for the AI calls themselves — the real breakdown is above. That mattered to me specifically because I wanted permission to experiment without it needing to become a whole financial commitment first.

What tech would I actually need?

Less than I assumed going in, and less than most "learn AI development" courses imply. I already knew the shape of a stack — frontend, backend, hosting — from years of engineering work I wasn't actively using day to day. What I didn't know going in (prompt design, serverless functions, wiring the Anthropic API) I learned exactly when the project asked for it, not before. That's just-in-time learning, not as an essay this time, but as the actual thing I did.

What would it expose about my own gaps?

A few, and some surprised me: I hadn't touched serverless deploy specifics in years, Node's stricter module rules bit me twice, and I learned Vercel has a security setting that can quietly block your own live API. None of it showed up until the code was actually running — which is its own lesson. You can't always learn a gap before you hit it. You can only get faster at closing it once you do.

How would it make me feel?

Genuinely more capable, in a way that had nothing to do with the code itself. I felt something similar this past winter, re-learning to ski so I could keep up with my 8-year-old on the slopes — the actual skill mattered less than proving to myself, again, that I could still pick something up. At this stage of life, those small, real wins are doing more for my confidence than they used to. Building Uncover was the engineering version of the same thing.

None of this makes me an AI engineer, and it didn't need to. I used expertise I already had — years of it — to build something new, faster than I expected, for less than I feared. That's the whole idea behind Femgineer: you don't need to master every layer of the stack. You need enough expertise in one area to recognize what good looks like, and enough curiosity to learn the rest. Uncover turned out to be evidence of that, not just a demonstration of it.


Ship It walks you through turning your own expertise into something real.

This build was basically a live example of it — backend expertise plus a weekend's curiosity, shipped as a real, working tool. If you want a structured way to do that with whatever you know, Ship It is the series for it.

Ship It is not another AI tooling course. It helps you identify a problem grounded in your experience, shape the smallest useful solution, and move it from idea to launch.

Want more from this specific build? Validation steps for both the tutorial and the app itself — the checks worth running before you trust either one — are going out to the Ship It list. Join, and they'll land in your inbox.